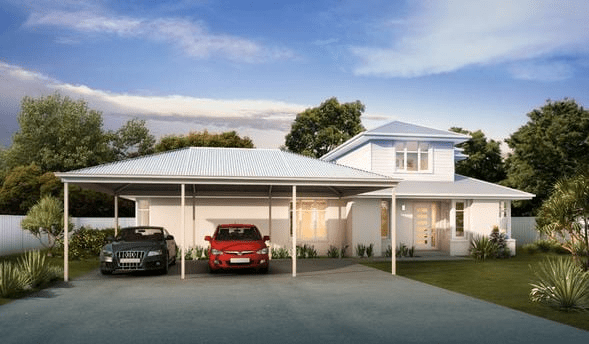
Adding a carport to the side of your home is a practical and stylish way to protect vehicles from weather damage while enhancing your property’s curb appeal. A hip roof carport offers superior durability, stability, and aesthetic appeal compared to simpler roof designs. If you are wondering how to build hip roof carport on side of house, this guide provides a comprehensive, step-by-step approach covering planning, materials, construction, and finishing touches.
How To Build Hip Roof Carport On Side Of House: Understanding the Basics
A hip roof features four sloping sides that meet at the top to form a ridge or a single point, creating a pyramid-like structure. Unlike gable roofs, which have two slopes, hip roofs are more stable in high-wind areas and provide better protection from heavy rain or snow.
Read too: Is It Reasonable to Ask the Seller to Replace the Roof?
Benefits of a Hip Roof Carport
- Enhanced Stability: Slopes on all sides distribute wind and snow loads evenly.
- Efficient Drainage: Water and snow easily slide off all sides, preventing pooling and leaks.
- Aesthetic Appeal: Offers a modern, elegant look that complements various house styles.
- Durability: Four-sided roof design resists weather-related wear better than simpler roofs.
- Increased Shade and Protection: The extended eaves offer better coverage for vehicles.
Understanding these benefits helps homeowners plan a functional and visually appealing carport.
Materials You Will Need
Before beginning, gather all necessary materials for a sturdy hip roof carport:
- Lumber: 4×4 posts for vertical supports, 2×6 or 2×8 boards for rafters and framing
- Plywood or OSB Sheets: For roof decking
- Roofing Material: Asphalt shingles, metal panels, or corrugated sheets
- Concrete: For anchoring posts securely
- Nails or Screws: Galvanized to resist rust
- Flashing and Sealant: For waterproofing edges and joints
- Roof Ventilation Components (Optional): Ridge vents or soffit vents
- Tools: Saw, hammer, drill, measuring tape, level, ladder
Having all materials ready before construction ensures a smoother process and a more durable carport.
Step 1: Planning and Design
Careful planning is crucial for a hip roof carport:
- Choose the Location: Attach to the side of the house that allows vehicle access and complies with local regulations.
- Measure the Area: Ensure enough clearance for cars—typically 12–16 feet wide and 18–20 feet deep.
- Check Local Building Codes: Obtain permits and follow setback, height, and structural requirements.
- Determine Roof Pitch: Typical hip roof pitch ranges from 4:12 to 8:12 depending on aesthetics and drainage needs.
Proper planning ensures your carport is functional, safe, and meets all legal requirements.
Step 2: Preparing the Site
Prepare the site to ensure a solid foundation:
- Clear the Area: Remove grass, debris, or obstacles.
- Mark Post Locations: Use stakes and string to outline the footprint of the carport.
- Level the Ground: A flat surface prevents structural issues and ensures posts sit evenly.
Site preparation is critical to achieving a stable and durable carport.
Step 3: Installing Support Posts
Support posts provide the backbone of the carport:
- Dig Holes for Posts: Typically 2–3 feet deep, depending on frost lines in your region.
- Place Posts and Pour Concrete: Use 4×4 pressure-treated posts, ensure plumb alignment, and pour concrete.
- Allow Concrete to Cure: Wait at least 24–48 hours before adding structural elements.
Properly installed posts guarantee the carport’s long-term stability.
Step 4: Framing the Hip Roof
Framing a hip roof is more complex than gable or flat roofs:
- Install Ridge Beam (If Needed): Central support for rafters. Some hip roofs meet at a single ridge or point.
- Attach Common Rafters: Connect the top of the posts to the ridge or center point.
- Install Hip Rafters: Diagonal rafters connect corners to the ridge or peak, creating the hip shape.
- Add Jack Rafters: Fill spaces between common and hip rafters to complete the frame.
- Check Level and Symmetry: Use a level and measuring tape to ensure accuracy.
Accurate framing is essential for a stable and visually balanced hip roof.
Step 5: Adding Roof Decking
After framing, install the roof decking:
- Lay Plywood or OSB Sheets: Begin at the bottom and work upward, securing to rafters.
- Ensure Overlap: Prevents leaks by overlapping sheets appropriately.
- Check Alignment: Ensure decking is flush and properly supported by rafters.
Decking forms a solid base for roofing material and contributes to the roof’s structural integrity.
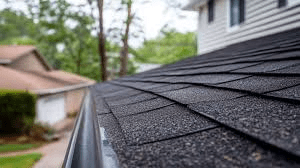
Step 6: Installing Roofing Material
Proper roofing protects the carport from weather:
- Apply Underlayment: Install waterproof roofing felt or membrane over the decking.
- Install Flashing: Seal edges, corners, and where the roof meets the house.
- Attach Shingles or Metal Panels: Follow manufacturer instructions for spacing and fasteners.
- Seal and Inspect: Ensure all seams and edges are properly sealed to prevent leaks.
This step ensures durability, weather resistance, and long-term protection.
Step 7: Optional Features and Finishing Touches
Enhance your hip roof carport with additional features:
- Gutters and Downspouts: Direct rainwater away from the house foundation.
- Side Panels or Lattice: Offer wind protection or aesthetic appeal.
- Lighting: Install outdoor-rated fixtures for nighttime visibility.
- Paint or Stain: Protect wood and improve curb appeal.
These features increase functionality, comfort, and visual appeal.
Tips for a Successful Hip Roof Carport
- Use Pressure-Treated Lumber: Resists rot and extends lifespan.
- Account for Climate Loads: Reinforce rafters for high winds or snow.
- Maintain Proper Overhangs: Protect vehicles and house walls from water.
- Use Temporary Bracing: Stabilize rafters and beams during construction.
Following these tips ensures a strong, safe, and long-lasting carport.
Advantages of a Hip Roof Carport on Side of House
- Enhanced Stability: Slopes on all sides resist strong winds and heavy snow.
- Improved Water Drainage: Prevents pooling and water damage.
- Visual Appeal: Blends seamlessly with modern and traditional homes.
- Increased Protection: Extended eaves provide better coverage for vehicles.
A hip roof carport is both functional and visually appealing, enhancing the overall home value.
How To Build Hip Roof Carport On Side Of House: Final Thoughts
Building a hip roof carport on the side of your house is a rewarding project that combines functionality, aesthetics, and durability. By following the steps outlined—planning, site preparation, post installation, framing, decking, roofing, and finishing—you can construct a carport that protects vehicles, withstands weather, and complements your home’s architecture.
Properly executed, a hip roof carport not only improves your property’s value but also provides a safe and attractive space for parking. With careful planning, quality materials, and attention to detail, homeowners can enjoy a long-lasting structure that offers both practicality and curb appeal.

Leave a Reply