Slate roofs are renowned for their elegance, durability, and longevity, making them a popular choice for homeowners looking to invest in a high-quality roofing system. However, installing a slate roof requires precision, skill, and proper techniques. If you’re considering this classic roofing option, understanding the installation process is crucial. In this comprehensive guide, we will walk you through how to install a slate roof, covering everything from preparation to finishing touches.
What You Need to Know About Slate Roof Installation
Slate roofing is a time-honored choice for its timeless beauty and durability. Installing a slate roof is a complex process that involves careful planning and execution. Here’s a detailed overview of what you need to know:
- Understanding Slate Roofing
- Preparation for Installation
- Installing the Slate Roof
- Finishing Touches and Maintenance
Read too: Is It Reasonable to Ask the Seller to Replace the Roof?
Understanding Slate Roofing
Before diving into the installation process, it’s important to understand what makes slate roofing unique and why it’s a favored option.
1. Benefits of Slate Roofs
- Durability: Slate is incredibly durable and can last over 100 years with proper maintenance. It is resistant to fire, insects, and rot.
- Aesthetic Appeal: Slate roofs provide a classic, elegant look with natural variations in color and texture that add character to a home.
- Low Maintenance: Slate requires minimal maintenance compared to other roofing materials. When installed correctly, it can withstand harsh weather conditions.
2. Types of Slate
- Natural Slate: This is cut directly from slate quarries and is available in various colors and thicknesses. It is the most traditional and high-quality option.
- Synthetic Slate: Made from materials like rubber or plastic, synthetic slate mimics the appearance of natural slate but is generally lighter and less expensive.
Preparation for Installation
Proper preparation is essential for a successful slate roof installation. Here’s how to prepare your roof and materials:
1. Assess the Roof Structure
- Inspection: Inspect your roof’s structure to ensure it can support the weight of slate. Slate tiles are heavy, and the underlying structure must be robust enough to bear this load.
- Repairs: Make any necessary repairs to the existing roof structure, including replacing damaged rafters or sheathing.
2. Gather Materials and Tools
- Slate Tiles: Order the appropriate type and quantity of slate tiles. Slate is typically sold by the square foot, and you should purchase about 10% more than needed to account for waste and cuts.
- Underlayment: Install a high-quality underlayment, such as a synthetic or rubberized material, to provide an extra layer of protection against moisture.
- Flashing: Use copper or aluminum flashing around roof penetrations like chimneys and vents.
- Fasteners: Stainless steel or copper nails are preferred for attaching slate tiles, as they are resistant to rust and corrosion.
3. Prepare the Roof Deck
- Clean the Deck: Remove any debris, old roofing material, and nails from the roof deck to ensure a clean surface for the underlayment.
- Install the Underlayment: Roll out the underlayment in overlapping layers to create a waterproof barrier. Secure it according to the manufacturer’s instructions.
How to Install Slate Roof
With your preparation complete, you’re ready to start the slate roof installation process. Follow these steps to ensure a professional and lasting finish:
1. Lay the Starter Course
- Positioning: Begin by laying a starter course of slate tiles along the eaves of the roof. This row provides a foundation for the rest of the installation and helps with water runoff.
- Fastening: Secure the starter course with nails, ensuring that the tiles are level and properly aligned.
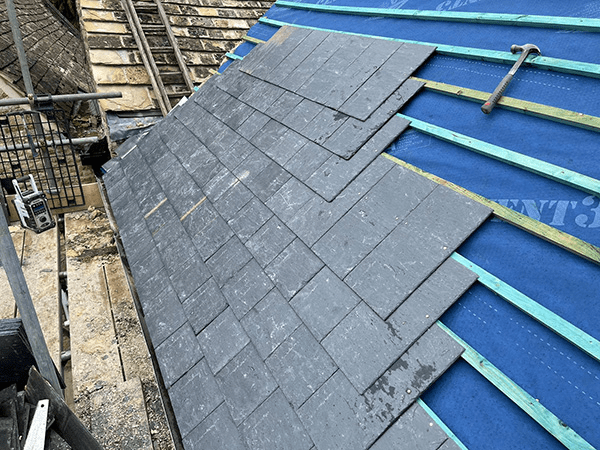
2. Install the Slate Tiles
- Tile Placement: Begin placing slate tiles from the bottom edge of the roof and work your way up. Overlap each row of tiles by at least 2 inches to ensure proper water drainage.
- Nailing: Use stainless steel or copper nails to secure each tile. Nail the tiles through the top portion, making sure not to puncture the slate itself. Proper nailing prevents water infiltration and maintains the integrity of the roof.
- Cutting Tiles: Use a slate cutter or a diamond blade saw to cut tiles as needed for edges and around roof features. Ensure that cuts are precise to fit neatly against adjacent tiles.
3. Install Flashing and Roofing Accessories
- Flashing Installation: Install flashing around chimneys, vents, and any other roof penetrations. This helps prevent water from seeping under the slate tiles.
- Accessory Installation: Add other roofing accessories such as ridge caps and vent covers, ensuring they are properly sealed and integrated with the slate tiles.
4. Inspect and Finish
- Final Inspection: Check the entire roof for any missed spots, improperly aligned tiles, or loose nails. Make any necessary adjustments to ensure a uniform and watertight installation.
- Cleaning: Remove any debris from the roof and surrounding area. Clean the slate tiles if needed to remove any marks or stains from the installation process.
Finishing Touches and Maintenance
After completing the installation, it’s essential to perform regular maintenance to keep your slate roof in top condition:
1. Regular Inspections
- Annual Checkups: Inspect your slate roof at least once a year, especially after severe weather conditions. Look for loose or damaged tiles and address any issues promptly.
- Professional Maintenance: Consider hiring a professional roofer for a thorough inspection and maintenance every few years.
2. Cleaning
- Gentle Cleaning: Clean your slate roof using a soft brush or low-pressure wash to remove debris and prevent the buildup of moss or algae. Avoid using harsh chemicals or high-pressure washing, as these can damage the slate.
3. Repairs
- Tile Replacement: If any slate tiles become damaged or cracked, replace them promptly to prevent water infiltration and further damage.
Conclusion
Installing a slate roof is a significant investment that can enhance the beauty and durability of your home. By understanding how to install a slate roof and following the proper steps, you can ensure a successful installation and enjoy the long-lasting benefits of this timeless roofing material.
Whether you choose to tackle the installation yourself or hire a professional, proper preparation, accurate installation, and regular maintenance are key to achieving a high-quality slate roof that will protect your home for decades to come.


Leave a Reply