Home security has become a top priority for modern households, and wired camera systems remain one of the most reliable options for monitoring and protecting property. If you live in a home with a flat roof, you may be wondering how best to position and connect cameras for maximum coverage. This guide will show you exactly how to install wired cameras in house with flat roof, including tools, planning, wiring methods, and safety considerations.
By the end of this article, you’ll understand how to prepare your home, mount cameras, run wires, and set up your system for long-term reliability.
Why Choose Wired Cameras for a House with a Flat Roof?
Before diving into the details of how to install wired cameras in house with flat roof, it’s important to understand why wired systems are beneficial:
- Reliable Connection – Wired cameras don’t suffer from Wi-Fi drops or interference.
- High-Quality Footage – Support for HD and 4K video without compression.
- Continuous Power – Cameras receive power through Ethernet or dedicated cabling.
- Scalability – Easier to expand without worrying about bandwidth limits.
- Flat Roof Advantage – Flat roofs allow more flexible placement of cables and cameras compared to pitched roofs.
Tools and Materials You’ll Need
To install a wired security camera system, gather these essentials:
- Security camera kit (DVR/NVR + cameras)
- Ethernet (Cat5e or Cat6) or coaxial cables
- Power supply cables or PoE (Power over Ethernet) switch
- Drill with masonry and wood bits
- Fish tape or cable puller
- Screws, anchors, and mounting brackets
- Weatherproof junction boxes
- Ladder and safety gear
- Silicone sealant or waterproof grommets
- Monitor or mobile app for system setup
Read too: Hail Damage Roof Repair: Essential Guide to Restoring Your Home’s Protection
Planning the Installation
Proper planning ensures smooth installation. Here’s what to consider:
- Camera Placement
- Corners of the house for wide coverage.
- Entry points like doors, windows, and garage.
- Roof access areas if applicable.
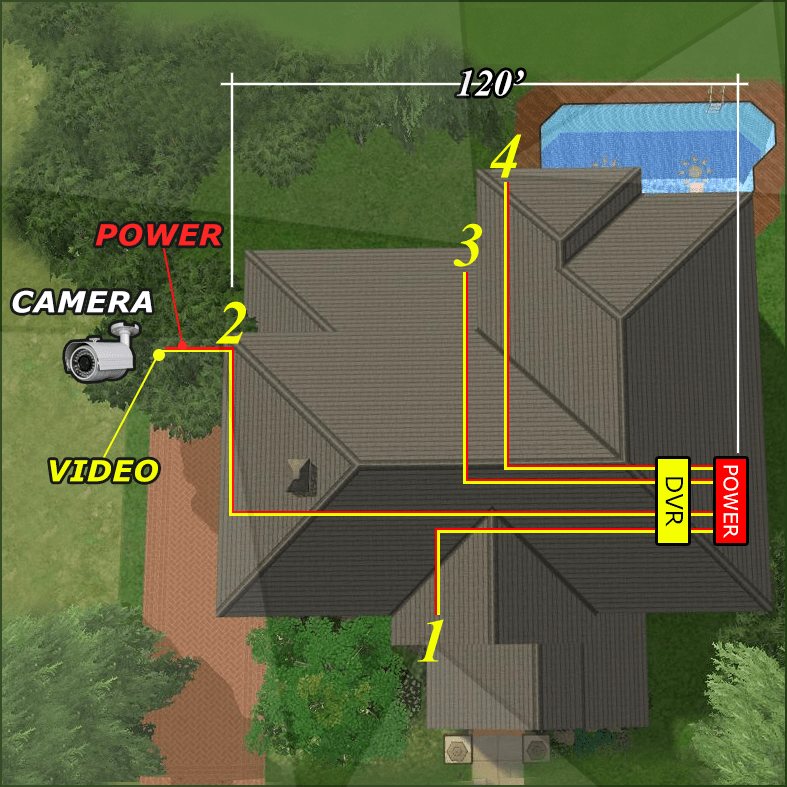
- Wiring Pathways
- Run cables along the flat roof edges.
- Conceal cables inside conduits for weather protection.
- Drop wires through walls or ceiling cavities into the DVR location.
- DVR/NVR Location
- Place in a central, secure, and ventilated spot inside the house.
- Ensure nearby access to power and internet router.
- Power Source
- Decide if you’ll use PoE for simplified wiring or separate power adapters.
How To Install Wired Cameras In House With Flat Roof
Here’s the detailed process broken into steps:
Step 1: Mark Camera Positions
- Use a marker to outline where each camera will be mounted.
- Ensure the field of view covers key areas without blind spots.
- On a flat roof, edge positions give maximum coverage.
Step 2: Drill Mounting and Cable Holes
- Drill pilot holes for camera screws.
- Create a hole for the cable to pass through into the house or junction box.
- Seal drilled areas with silicone to prevent leaks.
Step 3: Mount the Cameras
- Attach the mounting bracket securely using screws and anchors.
- Fix the camera to the bracket and adjust angles.
- For roof-mounted cameras, consider weatherproof housings.
Step 4: Run the Cables
- Use conduits or cable raceways along roof edges to hide wires.
- Run Ethernet or coaxial cables through drilled holes into the interior walls.
- For longer runs, use fish tape to pull cables through ceilings or crawl spaces.
Step 5: Connect to Power Supply
- If using PoE cameras, connect to a PoE switch or PoE-enabled NVR.
- For analog cameras, use Siamese cable (video + power).
- Ensure cables are secured and protected from UV and rain exposure.
Step 6: Connect to DVR/NVR
- Plug camera cables into the DVR/NVR system.
- Connect DVR/NVR to a monitor for live viewing.
- Use HDMI or VGA cables for display connection.
Step 7: Configure the System
- Power on the DVR/NVR.
- Set up recording schedules, motion detection, and alerts.
- Link the system to your smartphone app for remote access.
Step 8: Test the Cameras
- Check each camera’s feed for clarity.
- Adjust angles if needed.
- Ensure night vision and motion detection function properly.
Safety Considerations
Working on a flat roof reduces the risk of slipping compared to pitched roofs, but you still need to stay safe:
- Always use a stable ladder when accessing the roof.
- Wear non-slip shoes.
- Avoid working in wet or windy conditions.
- Secure cables to prevent tripping hazards.
- Ensure all electrical connections are waterproof.
Common Mistakes to Avoid
When learning how to install wired cameras in house with flat roof, avoid these common errors:
- Exposed Wires – Leaving cables unprotected leads to weather damage.
- Poor Camera Placement – Installing too high or low reduces coverage.
- Insufficient Power Supply – Cameras may flicker or shut off.
- Skipping Waterproofing – Can cause water leaks into the home.
- Not Testing Before Final Mounting – Saves time and prevents rework.
Cost Considerations
The cost of installation varies depending on the number of cameras and materials:
- DIY Installation: $300–$800 (equipment + materials).
- Professional Installation: $1,000–$3,000 depending on system size.
Factors influencing cost include:
- Camera type (HD, 4K, PTZ).
- Cabling length and complexity.
- Whether PoE or separate power adapters are used.
Maintenance Tips for Wired Cameras
Once your system is installed, follow these steps to maintain performance:
- Inspect cables annually for wear or UV damage.
- Clean camera lenses regularly for clear footage.
- Check DVR/NVR storage space and delete old recordings.
- Update firmware for cameras and NVR/DVR.
- Test night vision and motion detection monthly.
Final Thoughts
Learning how to install wired cameras in house with flat roof is a valuable project for homeowners seeking reliable home security. With the right planning, tools, and installation techniques, you can achieve professional-level results while saving money.
Flat roofs provide an advantage by making cable routing easier and camera mounting more flexible. Whether you choose to install the cameras yourself or hire professionals, understanding the process ensures you get maximum coverage, durability, and peace of mind.
Leave a Reply