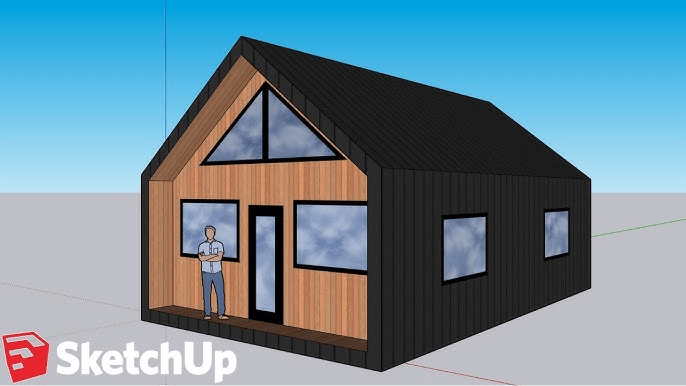
Designing a house in 3D can feel intimidating when you are just starting out. Luckily, SketchUp makes the process simple and enjoyable, even if you have no background in architecture or design. If you want to create your first digital home, this guide will walk you through how to make a simple house with roof in SketchUp. From basic shapes to adding a roof and refining the final design, you’ll learn step-by-step how to turn your ideas into a digital structure.
Read too: Is It Reasonable to Ask the Seller to Replace the Roof?
Whether you’re a student, hobbyist, or future designer, mastering this process can help you build realistic models for school projects, personal designs, or even professional presentations.
Why Use SketchUp for House Modeling?
SketchUp is one of the most user-friendly 3D modeling tools available. Its drag-and-click interface allows beginners to create complex designs quickly. Unlike heavy architectural software, SketchUp is lightweight, intuitive, and offers a free version that’s more than enough for small projects like building a basic house with a roof.
Some of the biggest advantages of using SketchUp include:
- Ease of learning: The tools are simple and intuitive.
- Free version available: Ideal for beginners.
- Versatility: Great for houses, furniture, landscapes, and more.
- Community support: Thousands of tutorials and models are available online.
By the end of this guide, you’ll know exactly how to make a simple house with roof in SketchUp without feeling overwhelmed.
Getting Started: Preparing Your SketchUp Workspace
Before diving into building, set up your workspace so the process feels smooth:
- Open SketchUp – Use the free version (SketchUp Free in browser) or SketchUp Pro if you have it.
- Choose a template – Pick “Architectural Design – Feet and Inches” or “Architectural Design – Millimeters” depending on your preferred measurement system.
- Familiarize yourself with tools – Pay attention to the Rectangle Tool, Push/Pull Tool, Line Tool, Orbit Tool, and Move Tool. These are the core features you’ll use.
Step 1: Drawing the Base of the House
The foundation of your house begins with a simple rectangle.
- Select the Rectangle Tool (R).
- Click anywhere on the ground plane and drag to form a rectangle.
- Enter exact measurements (e.g., 20’ x 15’ or 6000mm x 4500mm) for a precise base.
- Switch to the Push/Pull Tool (P) and pull the rectangle upward to give it height (around 10’ or 3000mm is common for walls).
Now you have a basic box, which will act as the body of your house.
Step 2: Adding Doors and Windows
To make your house look realistic, add doors and windows.
- Use the Rectangle Tool to draw shapes on the front face of the box for doors and windows.
- Apply the Push/Pull Tool to push the shapes inward, creating cutouts.
- You can also draw frames around windows for added detail.
- If you want, search for ready-made door and window components in SketchUp’s 3D Warehouse and import them into your project.
At this stage, your box now resembles a real house with entry points.
Step 3: How To Make A Simple House With Roof In Sketchup
This is the most exciting part—turning your box-shaped structure into a proper home by adding a roof.
- Switch to the Line Tool (L).
- Draw a line along the center of the top edge of your house. This will act as the roof’s ridge.
- Select the Move Tool (M), click the middle line, and drag it upward. You will see a triangular roof shape forming.
- Repeat the same process for the other side if needed.
- For more complex designs, experiment with the Offset Tool to create roof overhangs or add details like chimneys.
Now you know how to make a simple house with roof in SketchUp that looks realistic and complete.
Step 4: Refining and Detailing the Roof
A simple triangular roof works, but you can make it more interesting:
- Add thickness – Use the Push/Pull Tool to give the roof panels depth.
- Overhangs – With the Offset Tool, create roof edges that extend beyond the walls.
- Materials – Open the Materials window and apply shingles, tiles, or metal textures to your roof.
These small details will instantly make your model look more polished.
Step 5: Adding Colors and Textures
A house doesn’t look complete without finishing touches:
- Open the Materials Window from the default tray.
- Choose textures like brick, stone, glass, or paint colors.
- Apply materials to walls, doors, windows, and the roof.
Using realistic textures helps viewers imagine how the house might look in real life.
Step 6: Creating Surroundings
To give your house context, add a ground plane and some environment details:
- Draw a large rectangle around the house for a yard.
- Apply grass or pavement textures.
- Import trees, cars, or fences from the 3D Warehouse.
This extra effort makes your project presentation-ready.
Step 7: Saving and Exporting Your Model
When your house is ready, save your project:
- Click File → Save As.
- Choose the SketchUp file format (.skp).
- To share your design, export it as a 2D image (JPG/PNG) or as a 3D model.
Tips for Beginners
- Use layers and groups – Keep your model organized.
- Practice orbiting – Moving around your model is crucial for precise design.
- Undo mistakes – SketchUp has unlimited undo, so don’t be afraid to experiment.
- Learn shortcuts – For example, “R” for Rectangle, “P” for Push/Pull, “L” for Line, “M” for Move.
Why Learning How To Make A Simple House With Roof In SketchUp Matters
Mastering this skill is not just about playing with 3D software. It has practical applications:
- Architecture students can quickly model assignments.
- Interior designers can experiment with layouts.
- Hobbyists can visualize dream homes.
- Educators can teach geometry and spatial reasoning.
Knowing how to make a simple house with roof in SketchUp empowers you to bring your ideas to life digitally without needing advanced CAD software.
Common Mistakes to Avoid
When creating your first house in SketchUp, beginners often run into these issues:
- Forgetting measurements – Always use exact dimensions for accuracy.
- Not grouping elements – If you don’t group walls, windows, and roofs, they may stick together and distort.
- Overcomplicating the design – Start simple before moving on to complex details.
- Ignoring textures – A house without color or material feels incomplete.
Avoiding these mistakes will save you hours of frustration.
Conclusion
Building your first digital home doesn’t need to be overwhelming. By following these steps, you now know how to make a simple house with roof in SketchUp—from laying out the base to creating walls, adding doors and windows, and finishing with a roof.
With practice, you’ll be able to create more detailed houses, experiment with different roof styles, and design realistic environments around your models. The key is to start small, master the basics, and gradually push your creativity further.
So, open SketchUp today and begin experimenting. In no time, you’ll be designing beautiful 3D houses that look professional, even as a beginner.
Leave a Reply