How to Shingle a Shed Roof with Pictures for Easy DIY? Shingling a shed roof is a rewarding DIY project that enhances both the appearance and durability of your outdoor storage space. Whether you’re replacing old shingles or installing new ones, this step-by-step guide with pictures will walk you through the process of achieving a professional-quality roof for your shed.
Preparation and Planning
Before you begin, gather the necessary tools and materials:
- Asphalt shingles
- Roofing nails
- Roofing felt
- Hammer or nail gun
- Utility knife
- Ladder and safety gear
Measure your shed roof’s dimensions to estimate the amount of shingles and other materials required. Ensure safety by using a stable ladder and wearing appropriate protective gear throughout the project.
How to Shingle a Shed Roof Pictures: Step-by-Step Guide
Step 1: Prepare the Roof Surface
Ensure the roof surface is clean, dry, and free of debris. Install roofing felt as an underlayment, starting from the bottom edge and overlapping each subsequent row to shed water effectively.
Step 2: Snap Chalk Lines
Use a chalk line to create guidelines for the shingle rows, ensuring straight and evenly spaced installation.
Step 3: Install Starter Shingles
Begin at the bottom edge of the roof and install starter shingles upside down to create a solid base. Nail them securely along the eaves, following manufacturer recommendations for spacing.
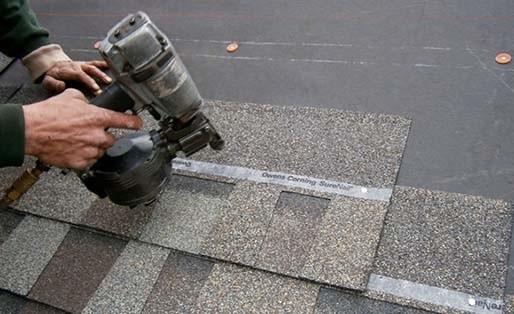
Step 4: Apply Asphalt Shingles
- First Row: Start at the bottom corner, aligning the first shingle with the chalk line. Nail it in place, ensuring proper alignment and overhang.
- Subsequent Rows: Continue laying shingles row by row, staggering each row to prevent water seepage. Use full shingles at the bottom of each row and cut shingles as needed for the top row.
Step 5: Cut and Fit Shingles
Use a utility knife to cut shingles to size for edges, valleys, and around vents. Ensure a snug fit and proper sealing to prevent water infiltration.
Step 6: Install Ridge Shingles
Finish the roof with ridge shingles along the peak. These shingles are specially designed to cap the roof and provide a finished appearance while reinforcing the structure.
Maintenance Tips for Shed Roof Shingles
- Inspect the roof annually for damage or loose shingles.
- Replace damaged shingles promptly to prevent water damage.
- Keep gutters and drainage systems clear to avoid water buildup.
Read too: Decoding Timelines: How Long Does It Take To Replace A Roof and What to Expect
Benefits of Properly Shingled Shed Roofs
- Enhances shed durability and weather resistance.
- Improves shed aesthetics and curb appeal.
- Increases property value and resale potential.
Conclusion
Shingling a shed roof with the help of detailed pictures and instructions is a manageable DIY project that can significantly enhance your shed’s functionality and appearance. By following these steps and maintaining your roof regularly, you can enjoy a well-protected and visually appealing shed for years to come.


Leave a Reply