When it comes to maintaining a functional plumbing system in your home, one crucial aspect is ensuring proper ventilation. Installing plumbing vent through roof is a vital process that helps prevent sewer gases from entering your living space and ensures efficient drainage. In this article, we’ll explore the importance of plumbing vents, the steps involved in the installation process, necessary tools, and tips for maintenance.
Understanding Plumbing Vents
What is a Plumbing Vent?
A plumbing vent, also known as a vent stack or vent pipe, is a vertical pipe that connects the plumbing system to the outside atmosphere. Its primary function is to allow air to enter the plumbing system, helping to equalize pressure in the pipes. This prevents the vacuum that can lead to slow drainage and can also help in expelling sewer gases safely out of your home.
Read too: How To Replace Roof Shingles That Blew Off: A Comprehensive Guide
Why is Ventilation Important?
- Prevents Backflow: Proper ventilation prevents backflow of sewage, which can cause serious health hazards.
- Maintains Pressure Balance: It ensures that air pressure within the plumbing system is balanced, allowing for smooth drainage.
- Eliminates Odors: By venting sewer gases outside, plumbing vents help maintain a fresh indoor environment.
Benefits of Installing Plumbing Vent Through Roof
- Improved Airflow: Vents installed through the roof provide unobstructed airflow, ensuring optimal drainage.
- Saves Space: Roof vents save interior space compared to wall-mounted vents.
- Better Aesthetics: Properly installed vents can be less obtrusive and blend well with the roofing structure.
Tools and Materials Needed
Before starting the installation of a plumbing vent through the roof, gather the necessary tools and materials:
Tools
- Tape Measure: For accurate measurements.
- Circular Saw or Reciprocating Saw: To cut the vent pipe and roofing material.
- Drill: For making holes and securing the vent pipe.
- Level: To ensure the vent pipe is straight.
- Safety Gear: Including gloves, goggles, and a hard hat.
Materials
- PVC or ABS Vent Pipe: Choose the appropriate type based on your plumbing system.
- Roof Flashing: To seal around the vent pipe and prevent leaks.
- Sealant: Weatherproof sealant to ensure a tight fit.
- Vent Cap: To prevent debris and animals from entering the vent.
Steps for Installing Plumbing Vent Through Roof
Step 1: Planning the Installation
- Determine the Location: Select an appropriate spot on your roof for the vent. It should be at least 10 feet away from any windows and preferably located near the plumbing fixtures.
- Check Local Codes: Review local building codes and regulations regarding plumbing vent installations to ensure compliance.
Step 2: Measure and Cut
- Measure the Pipe Length: Measure the distance from the plumbing system to the roofline. Add extra length for any bends or turns.
- Cut the Vent Pipe: Using a circular saw or reciprocating saw, cut the vent pipe to the measured length.
Step 3: Prepare the Roof
- Mark the Cutting Area: Mark a circular outline on the roof where the vent will penetrate.
- Cut a Hole in the Roof: Carefully cut along the marked outline to create an opening for the vent pipe. Be cautious to avoid damaging surrounding roofing materials.
Step 4: Install the Vent Pipe
- Insert the Vent Pipe: Push the vent pipe through the hole from the underside of the roof. Ensure it extends at least 12 inches above the roofline.
- Secure the Pipe: Use brackets or straps to secure the vent pipe in place, ensuring it is level.
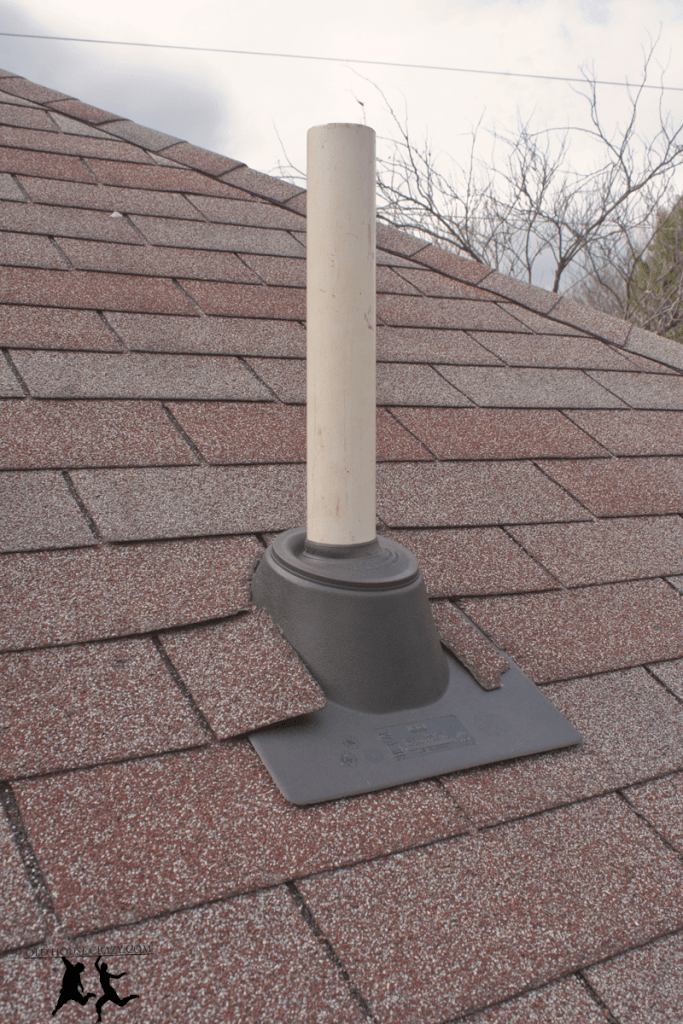
Step 5: Apply Roof Flashing
- Position the Flashing: Slide the roof flashing over the vent pipe, ensuring it covers the area where the pipe meets the roof.
- Secure the Flashing: Use roofing nails or screws to secure the flashing to the roof. Make sure to seal the edges with a weatherproof sealant to prevent leaks.
Step 6: Install the Vent Cap
- Attach the Vent Cap: Place the vent cap over the top of the vent pipe to keep out debris and animals.
- Secure the Cap: Use screws to ensure the vent cap is tightly secured to the pipe.
Step 7: Final Inspection
- Check for Leaks: Inspect the installation for any gaps or leaks. Ensure that the sealant is applied properly.
- Test the Vent: Run water through the plumbing system to check for proper drainage and ensure that air is flowing through the vent.
Maintenance Tips for Plumbing Vents
- Regular Inspections: Periodically inspect the vent for any signs of damage or blockage. Look for debris that may have accumulated on the vent cap.
- Clean the Vent: If you notice any blockages, clean the vent pipe to ensure proper airflow. A plumber’s snake can help remove any obstructions.
- Monitor Indoor Odors: If you start to notice sewer odors in your home, it could indicate a problem with the vent. Address the issue promptly to prevent health risks.
Common Issues and Troubleshooting
1. Blocked Vent Pipe
If your plumbing is slow to drain or you notice gurgling sounds, the vent pipe may be blocked. This can happen due to debris, snow, or animal nests. Regular maintenance can help prevent this.
2. Improper Sealing
If you experience leaks around the vent, check the sealant and flashing. Ensure that they are applied correctly and replace any damaged materials.
3. Sewer Gas Odors
Persistent odors can indicate a failure in the venting system. This may require a professional plumber to assess and repair the issue.
Conclusion
Installing plumbing vent through roof is a critical task that ensures your plumbing system functions efficiently and safely. By following the steps outlined in this guide and performing regular maintenance, you can help ensure that your home remains free from sewer gases and that your plumbing system operates smoothly. If you ever feel unsure about the installation process, consulting a professional plumber is always a wise choice.


Leave a Reply