Metal roofs are becoming increasingly popular due to their durability, energy efficiency, and aesthetic appeal. However, proper installation is crucial to maximizing these benefits. One of the most important factors to consider during installation is metal roofing screw spacing. In this article, we will explore the best practices, guidelines, and considerations for screw spacing in metal roofing applications to ensure a secure and long-lasting roof.
Understanding Metal Roofing
Metal roofing consists of panels or shingles made from materials such as steel, aluminum, copper, or zinc. These roofs are known for their longevity, often lasting 40 years or more with minimal maintenance. They are also resistant to extreme weather conditions, making them suitable for a wide range of climates.
Benefits of Metal Roofing
- Durability: Metal roofs can withstand high winds, heavy rain, and even hail. They are less likely to crack or corrode than other roofing materials.
- Energy Efficiency: Metal roofing reflects sunlight, reducing heat absorption in summer months. This can lead to lower cooling costs.
- Aesthetic Appeal: Metal roofs are available in various colors and styles, allowing homeowners to choose a look that complements their architecture.
- Eco-Friendly: Many metal roofing materials are made from recycled materials and can be recycled at the end of their life cycle.
Read too: Is It Reasonable to Ask the Seller to Replace the Roof?
Despite these advantages, proper installation is key to unlocking the full potential of a metal roof. Incorrect screw spacing can lead to leaks, corrosion, and other issues that undermine the roof’s longevity.
Importance of Proper Screw Spacing
Metal roofing relies on screws to secure panels to the underlying structure, typically plywood or metal battens. Proper screw spacing is vital for several reasons:
- Structural Integrity: Adequate spacing helps distribute weight evenly across the roof, reducing the risk of damage during extreme weather conditions.
- Leak Prevention: Tightening screws too close together can create stress points, leading to deformation and potential leaks. Conversely, spacing screws too far apart can cause panels to shift and expose the underlying structure.
- Wind Resistance: Proper screw spacing enhances the roof’s ability to withstand strong winds, preventing panels from lifting or detaching.
- Material Longevity: Correct installation reduces wear and tear on screws and panels, extending the life of the roof.
Recommended Metal Roofing Screw Spacing
The exact spacing for metal roofing screws can vary based on several factors, including:
- Type of Metal Roofing: Different materials may require different screw spacing.
- Manufacturer Guidelines: Always refer to the manufacturer’s specifications for their particular product.
- Roof Pitch: The angle of the roof can influence how screws should be spaced.
General Guidelines
While it’s crucial to refer to specific manufacturer instructions, here are some general guidelines for metal roofing screw spacing:
- For Roof Panels:
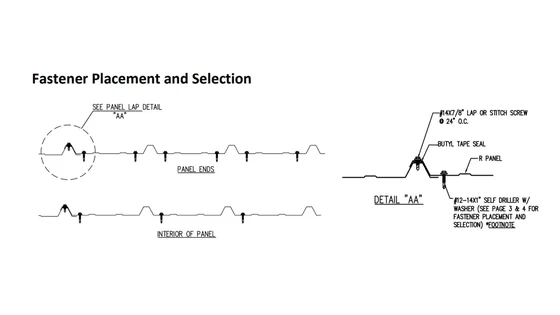
- Typically, screws should be placed every 24 inches along the panel’s length.
- Screws should also be installed every 12 to 18 inches along the eaves and ridges to ensure secure attachment.
- For Vertical Seams:
- Use screws at every other vertical seam, ensuring a tight seal.
- End Laps:
- Place screws every 12 inches on end laps to prevent water intrusion.
- Additional Support:
- If your roof has a low pitch or is located in a high-wind area, consider reducing the spacing to every 12 inches.
Factors Influencing Screw Spacing
- Panel Type: Different panel styles, such as standing seam or corrugated, may require different screw spacing.
- Local Building Codes: Check local codes and regulations, as they may have specific requirements for screw spacing based on climate and building types.
- Wind and Weather Considerations: In areas prone to heavy winds or snow, closer screw spacing can help prevent damage.
- Substrate Type: The type of substrate also plays a role in determining screw spacing. For example, metal purlins may require different spacing than plywood.
Tools and Materials Needed
To ensure accurate screw spacing and a successful installation, gather the following tools and materials:
- Metal Roofing Panels: Choose high-quality panels designed for your climate and aesthetic preference.
- Roofing Screws: Use self-drilling screws designed for metal roofs. Ensure they are corrosion-resistant, such as those with a rubber washer.
- Power Drill: A cordless power drill will help speed up the installation process.
- Measuring Tape: Accurate measurements are crucial for maintaining proper spacing.
- Square: A framing square can help ensure straight lines and proper alignment.
- Safety Gear: Always wear safety goggles, gloves, and non-slip shoes when working on a roof.
Installation Steps
Now that you understand the importance of metal roofing screw spacing and have gathered your tools, let’s walk through the installation steps.
1. Prepare the Roof Structure
Ensure that the roof structure is clean, dry, and free from debris. Check for any existing damage that may need repair before installing the new roof.
2. Install Underlayment
If required, install a suitable underlayment to provide additional moisture protection. This is particularly important in areas with heavy rain or snow.
3. Begin Panel Installation
- Position the First Panel: Start at the lowest point of the roof, aligning the first panel with the eaves.
- Secure the Panel: Place screws along the top edge of the panel, following the manufacturer’s recommended spacing (typically every 24 inches). Make sure not to over-tighten the screws, as this can cause deformation.
4. Overlap Subsequent Panels
- Align the Next Panel: Place the next panel next to the first, ensuring it overlaps properly according to manufacturer specifications.
- Repeat the Screw Process: Secure the second panel with screws at the recommended spacing.
5. Finish with Ridge Caps
Once all panels are in place, install the ridge caps. This is where proper screw spacing is crucial as well. Follow the manufacturer’s guidelines, typically placing screws every 12 inches along the ridge cap.
6. Final Inspection
After installation, conduct a thorough inspection to ensure that all screws are properly spaced and tightened. Look for any visible gaps or potential issues.
Maintenance Tips for Metal Roofing
Even after proper installation, regular maintenance is essential for keeping your metal roof in good shape.
- Inspect Annually: Check for loose screws, rust, or other signs of wear. Pay attention to the condition of the seams and overlaps.
- Clean Debris: Remove leaves, branches, and other debris that can trap moisture and cause rust.
- Check for Leaks: During heavy rains, monitor the interior of your home for leaks and inspect the roof for signs of water intrusion.
- Address Repairs Promptly: If you notice any damaged screws or panels, address the issue immediately to prevent further damage.
Conclusion
Understanding metal roofing screw spacing is vital for anyone considering or involved in metal roof installation. Proper screw spacing ensures the longevity and effectiveness of the roof, preventing leaks, enhancing wind resistance, and contributing to the overall structural integrity of your home. By following manufacturer guidelines and considering local building codes, you can ensure a successful installation that will last for years.


Leave a Reply