Hurricanes can wreak havoc on homes, leaving behind extensive damage that requires immediate attention. One of the most critical aspects of post-hurricane recovery is addressing your roof. Roof replacement after hurricane damage is often necessary to ensure the safety and integrity of your home. In this article, we will explore the steps to take when dealing with roof damage, how to assess the situation, and tips for a successful roof replacement.
Understanding Hurricane Damage
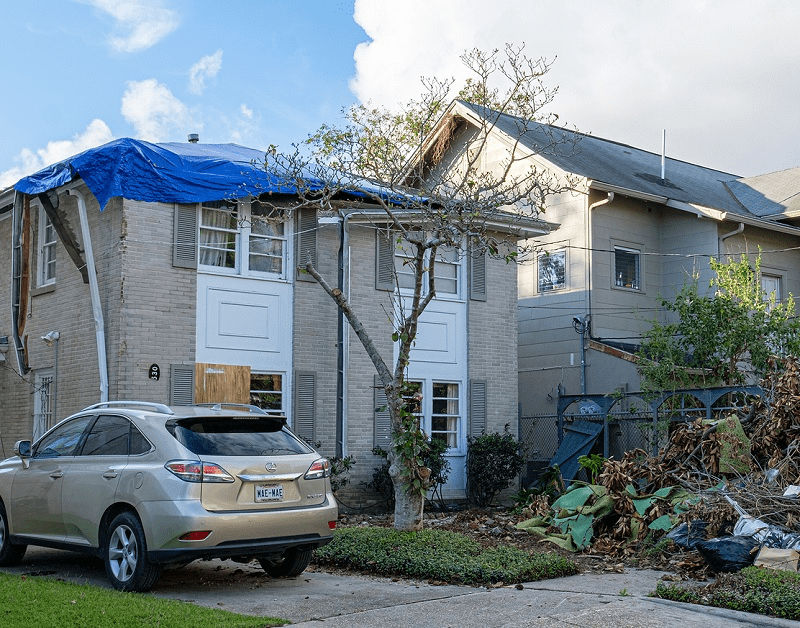
Hurricanes bring with them strong winds, heavy rain, and sometimes hail, all of which can severely damage roofs. Understanding the types of damage that can occur will help you assess your situation accurately.
Read too: How To Replace Roof Shingles That Blew Off: A Comprehensive Guide
Types of Roof Damage from Hurricanes
- Missing Shingles: High winds can easily lift shingles from your roof, leaving areas exposed to the elements.
- Cracked or Broken Shingles: Debris propelled by hurricane winds can break shingles, compromising your roof’s integrity.
- Flashing Damage: Flashing, the material used to direct water away from roof joints, can be dislodged or damaged, leading to leaks.
- Water Damage: Prolonged exposure to rain can lead to leaks inside your home, causing further damage to ceilings and walls.
- Structural Damage: In severe cases, the roof structure itself may be compromised, requiring complete replacement.
Steps to Take After a Hurricane
Assessing Roof Damage
The first step after a hurricane is to assess the damage to your roof. Safety should always be your priority, so consider the following steps:
- Wait for the Storm to Pass: Do not attempt to assess your roof during the storm. Wait until the winds have died down and it is safe to go outside.
- Visual Inspection: Use binoculars to inspect your roof from a distance. Look for missing shingles, sagging areas, or visible leaks.
- Check for Leaks: Inside your home, check for any signs of water intrusion, such as stains on ceilings or walls. This may indicate roof damage.
- Document the Damage: Take photos of all visible damage for your insurance claim. This documentation can be crucial when filing for assistance.
Hiring a Professional
After assessing the damage, it’s advisable to hire a professional roofing contractor to conduct a thorough inspection. Here’s why:
- Expert Assessment: Professionals can identify issues that may not be visible to the untrained eye, such as hidden water damage or structural concerns.
- Safety: Climbing on a roof can be dangerous, especially after a storm. Professionals have the equipment and experience to do this safely.
- Insurance Claims: A professional assessment can help you with your insurance claims, ensuring you receive the compensation you deserve.
Roof Replacement Process
Once you’ve confirmed that a roof replacement after hurricane damage is necessary, here are the steps involved in the process:
Step 1: Choose the Right Roofing Material
Selecting the right roofing material is crucial. Consider factors such as:
- Durability: Materials like metal or tile may be more resistant to wind and water damage compared to asphalt shingles.
- Aesthetic Appeal: Choose a roofing material that complements your home’s style.
- Cost: Balance your budget with the quality of the materials.
Step 2: Get Multiple Estimates
Before settling on a contractor, obtain multiple estimates. This will help you understand the market rate and ensure you get the best deal. When reviewing estimates, consider:
- Scope of Work: Ensure each estimate outlines the work to be done, including materials, labor, and timeline.
- Warranty: Check what warranties are offered on materials and workmanship.
Step 3: Prepare Your Home
Once you’ve chosen a contractor, it’s time to prepare your home for the roof replacement:
- Clear the Area: Remove any furniture or decorations from outside to protect them from debris.
- Inform Neighbors: Let your neighbors know about the upcoming work, especially if heavy equipment will be involved.
- Secure Your Property: Ensure that all windows and doors are closed to minimize dust and debris from entering your home.
Step 4: The Replacement Process
The actual replacement process involves several steps:
- Removing the Old Roof: The contractor will strip off the old roofing material and inspect the decking for damage.
- Repairing Any Damage: If the decking or structure is compromised, repairs will be made before new roofing material is installed.
- Installing the New Roof: The contractor will install the new roofing material, ensuring that everything is properly sealed and aligned.
- Final Inspection: After installation, a final inspection will ensure that everything is up to code and that there are no leaks.
After the Replacement
After your new roof is installed, there are a few steps you should take:
1. Conduct a Walk-Through
Once the work is complete, walk through your home and inspect for any potential issues. Check for:
- Proper Sealing: Ensure that all areas are properly sealed to prevent leaks.
- Debris Removal: Make sure the contractor cleans up any debris from the installation.
2. Document the New Roof
Just as you documented the damage, take photos of your new roof for your records. This will be helpful for future insurance claims or if you decide to sell your home.
3. Schedule Regular Maintenance
To prolong the life of your new roof, schedule regular maintenance checks. This includes:
- Cleaning Gutters: Ensure that gutters are clear of debris to prevent water build-up.
- Inspections: Have your roof inspected at least once a year, or after significant weather events.
Insurance Considerations
One of the most significant aspects of roof replacement after a hurricane is dealing with insurance claims. Here are some tips:
- Know Your Coverage: Understand what your homeowner’s insurance covers regarding hurricane damage and roof replacement.
- File Claims Promptly: Contact your insurance company as soon as possible after the storm. Provide them with documentation and any assessments you have obtained.
- Stay Organized: Keep all receipts, estimates, and documentation related to the roof replacement for your records and to support your claims.
Conclusion
Roof replacement after hurricane damage is a critical step in restoring your home’s safety and integrity. By understanding the damage, following the right steps for assessment, and selecting quality materials and contractors, you can ensure a successful roof replacement. Don’t forget to keep your insurance company informed and maintain your new roof to prevent future issues. Being proactive will not only protect your investment but will also provide peace of mind for years to come.


Leave a Reply