Installing roof trusses is a crucial step in building a strong and reliable roof structure. Roof trusses provide support for the roof and help distribute the load evenly across the building. Proper installation is essential for ensuring the structural integrity and longevity of your roof. In this detailed guide, we will explore everything you need to know about roof trusses and how to install them correctly.
What Are Roof Trusses?
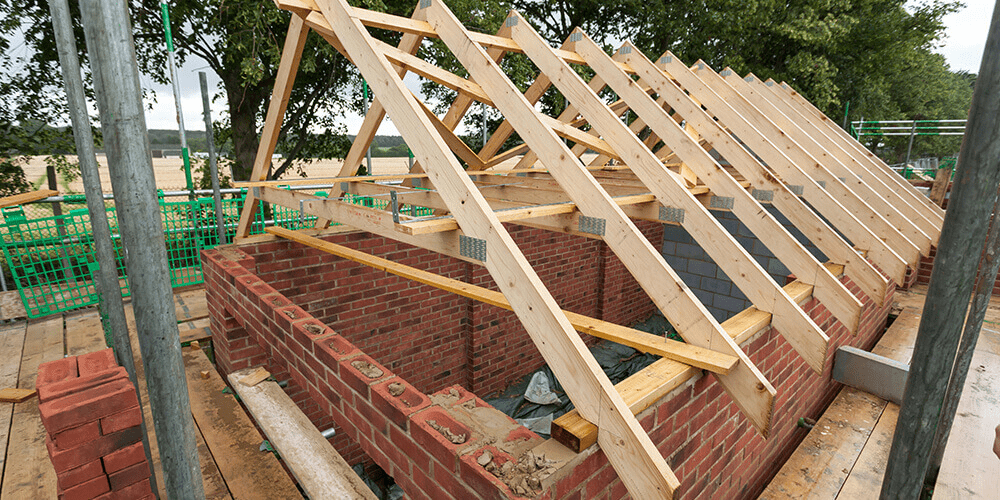
Roof trusses are pre-fabricated triangular frameworks used to support the roof of a building. They are made from timber, steel, or a combination of both and are designed to provide a strong and stable framework for the roof. Roof trusses are preferred over traditional rafters due to their efficiency, strength, and ease of installation.
Benefits of Using Roof Trusses
- Strength and Stability: Roof trusses are engineered to handle substantial loads and provide excellent support for the roof structure. They are designed to distribute weight evenly, reducing the risk of structural failure.
- Cost-Effective: Pre-fabricated roof trusses are often more cost-effective than traditional framing methods. They are manufactured in a factory, which reduces labor costs and material waste on-site.
- Ease of Installation: Roof trusses are delivered to the construction site pre-assembled, which simplifies the installation process. This can lead to faster construction times and reduced labor costs.
- Design Flexibility: Roof trusses come in various designs and sizes, allowing for flexibility in architectural design. They can accommodate various roof shapes, including gabled, hipped, and vaulted roofs.
Read too: How To Replace A Mobile Home Roof: Step-by-Step Guide for Homeowners
Roof Trusses How to Install: Step-by-Step Guide
Installing roof trusses requires careful planning and precise execution. Follow these steps to ensure a successful installation:
1. Preparation
Before starting the installation, proper preparation is essential:
- Review Plans and Specifications: Ensure you have the detailed plans and specifications for the roof trusses. Review the truss layout, dimensions, and load requirements.
- Gather Tools and Materials: You will need a variety of tools, including a tape measure, level, hammer, nail gun, and safety equipment such as harnesses and hard hats. Ensure you have all necessary materials, including trusses, nails, and bracing.
- Inspect the Foundation and Walls: Verify that the foundation and walls are level and properly aligned. Any discrepancies can affect the installation and performance of the roof trusses.
2. Setting the First Truss
The first truss is critical for establishing the alignment of the entire roof structure:
- Position the First Truss: Place the first truss at one end of the building, aligning it with the center of the building’s walls. Ensure it is positioned according to the plans and is level.
- Secure the Truss: Use temporary bracing to secure the first truss in place. This will provide stability as you continue with the installation. Ensure the truss is properly aligned and plumb before securing it permanently.
3. Installing Subsequent Trusses
With the first truss in place, you can proceed with installing the remaining trusses:
- Position Additional Trusses: Place each subsequent truss according to the spacing specified in the plans. Typically, trusses are spaced 16 to 24 inches apart, depending on the design and load requirements.
- Align and Secure Trusses: Align each truss with the previous one and ensure it is level. Secure the trusses to the top plates of the walls using nails or metal connectors. Use a nail gun for efficiency and accuracy.
- Install Bracing: Proper bracing is essential for maintaining the stability of the trusses. Install diagonal bracing between trusses as specified in the plans. This will help prevent lateral movement and ensure the roof remains stable.
4. Installing the Top Chord
The top chord connects the trusses and provides additional support:
- Position the Top Chord: Place the top chord along the peak of the trusses. Ensure it is properly aligned with the trusses and securely attached.
- Secure the Top Chord: Use nails or metal connectors to attach the top chord to the trusses. Ensure all connections are secure and properly aligned.
5. Final Inspection
Once all trusses and components are installed, conduct a thorough inspection:
- Check Alignment and Level: Ensure all trusses are properly aligned and level. Check for any gaps or misalignments that may need adjustment.
- Verify Bracing and Connections: Confirm that all bracing and connections are secure and meet the specifications. Address any issues before proceeding.
- Clean Up: Remove any debris or excess materials from the site. Ensure the area is clean and safe for further construction activities.
Common Mistakes to Avoid
When installing roof trusses, avoid these common mistakes:
- Incorrect Spacing: Improper spacing of trusses can lead to structural issues and affect the stability of the roof. Always follow the specifications provided in the plans.
- Poor Alignment: Misalignment of trusses can cause problems with the roof structure and may lead to costly repairs. Ensure trusses are properly aligned and level before securing them.
- Inadequate Bracing: Insufficient bracing can compromise the stability of the roof. Follow the plans carefully and install all required bracing to ensure a stable and secure roof.
- Neglecting Safety: Installing roof trusses involves working at heights and handling heavy materials. Always use appropriate safety equipment and follow safety guidelines to prevent accidents and injuries.
Maintenance and Care
Once the roof trusses are installed, proper maintenance is essential to ensure their longevity and performance:
- Regular Inspections: Periodically inspect the roof trusses for signs of damage or wear. Check for any loose connections or signs of structural issues.
- Address Issues Promptly: Address any issues or repairs promptly to prevent further damage. Regular maintenance will help extend the life of the roof trusses and maintain the integrity of the roof.
- Keep the Roof Clean: Remove any debris or materials that could cause damage to the trusses. Keeping the roof clean will help prevent issues and maintain the overall condition of the roof.
Conclusion
Installing roof trusses requires careful planning, precise execution, and attention to detail. By following the steps outlined in this guide, you can ensure a successful installation that provides a strong and stable foundation for your roof. Proper preparation, accurate alignment, and adequate bracing are key to achieving a reliable and durable roof structure.
If you are unsure about any aspect of the installation or prefer professional assistance, consider consulting with a roofing contractor. They can provide expert guidance and ensure that your roof trusses are installed correctly and effectively.


Leave a Reply