Standing seam metal roofing is celebrated for its durability, sleek appearance, and ability to withstand harsh weather conditions. One of the critical components of this roofing system is the hip detail, which ensures a seamless and watertight finish at the intersection of roof slopes. In this comprehensive guide, we’ll delve into the intricacies of the Standing Seam Metal Roof Hip Detail, exploring its importance, installation techniques, and best practices. Whether you’re a homeowner, contractor, or roofing professional, understanding this detail will help you achieve a superior roofing installation.
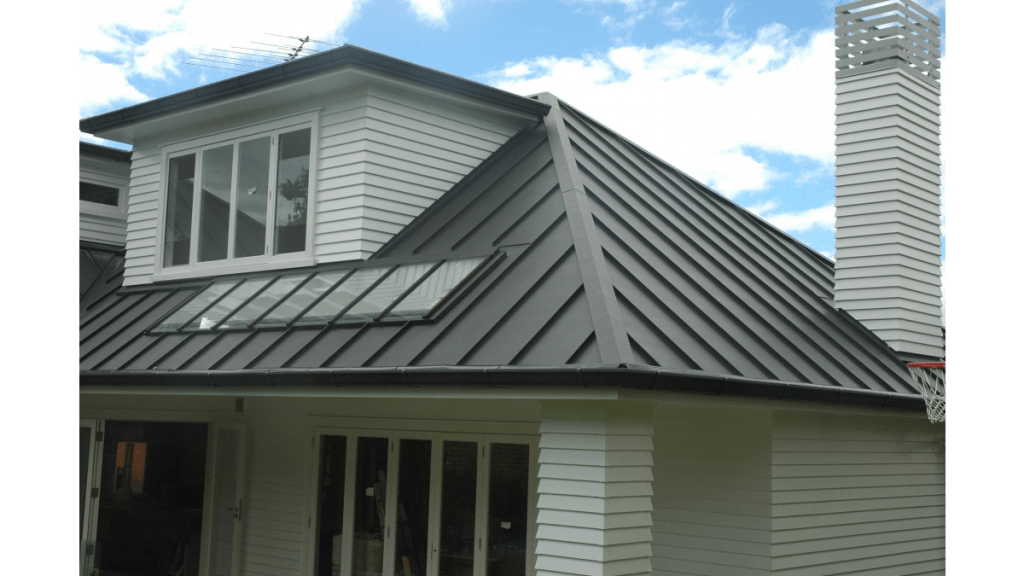
Why the Standing Seam Metal Roof Hip Detail Matters
The hip detail in a standing seam metal roof plays a crucial role in the overall performance and aesthetic of the roof. Here’s why it’s important:
1. Weather Resistance
The primary function of the hip detail is to ensure that the roof remains watertight at the junction where two roof planes meet. Properly executed, it prevents water infiltration and protects the underlying structure from potential water damage.
Read too: How To Replace Roof Shingles That Blew Off: A Comprehensive Guide
2. Structural Integrity
The hip detail contributes to the structural integrity of the roof. A well-installed hip detail helps maintain the roof’s durability by distributing stress and preventing potential weak points that could lead to leaks or structural failures.
3. Aesthetic Appeal
In addition to its functional benefits, the hip detail impacts the visual appeal of the roof. A properly finished hip detail contributes to a clean, seamless appearance, enhancing the overall aesthetic of the roofing system.
4. Longevity
A correctly installed standing seam metal roof hip detail can significantly extend the lifespan of the roof. By preventing leaks and maintaining structural integrity, it reduces the need for frequent repairs and replacements.
Understanding the Components of the Standing Seam Metal Roof Hip Detail
To properly execute a standing seam metal roof hip detail, it’s essential to understand the various components involved:
1. Hip Cap
The hip cap is a metal flashing that covers the intersection of the roof planes. It is designed to direct water away from the junction and protect the underlying structure. The hip cap is typically made from the same metal material as the rest of the roof, ensuring consistency in appearance and performance.
2. Hip Trim
Hip trim is used to cover the edges of the standing seam panels where they meet at the hip. It provides a finished look and helps to secure the panels in place. The trim is usually designed to match the color and style of the standing seam panels.
3. Underlayment
The underlayment is a layer of material installed beneath the metal roofing panels. It acts as an additional barrier against water infiltration and provides extra protection to the roof structure. For hip details, proper underlayment installation is crucial to ensure complete waterproofing.
4. Fasteners
Fasteners are used to secure the standing seam panels and hip components in place. The choice of fasteners and their installation method can impact the roof’s performance and longevity. Ensure that the fasteners are compatible with the metal roofing system and are installed correctly.
Installation Process for the Standing Seam Metal Roof Hip Detail
Proper installation of the standing seam metal roof hip detail is essential for achieving a durable and watertight finish. Here’s a step-by-step guide to the installation process:
1. Prepare the Roof Deck
Before installing the hip detail, ensure that the roof deck is clean, dry, and properly prepared. Any debris or imperfections should be addressed to provide a solid base for the underlayment and metal panels.
2. Install the Underlayment
Roll out the underlayment over the entire roof deck, including the area where the hip detail will be installed. Overlap the edges and secure the underlayment according to the manufacturer’s instructions. Ensure that it extends up the roof slopes and covers the area where the hip cap will be placed.
3. Position the Hip Cap
Place the hip cap over the intersection of the roof planes, ensuring that it covers the standing seam panels and extends over the underlayment. The hip cap should be aligned properly and centered over the hip line. Secure the hip cap using appropriate fasteners, following the manufacturer’s recommendations.
4. Attach the Hip Trim
Install the hip trim along the edges of the standing seam panels where they meet at the hip. The trim should be secured in place, covering the edges of the panels and providing a finished appearance. Ensure that the trim is properly aligned and attached securely.
5. Fasten the Panels
Secure the standing seam panels to the roof deck using the appropriate fasteners. Ensure that the panels are properly aligned and that the fasteners are installed according to the manufacturer’s guidelines. Pay special attention to the areas around the hip detail to ensure a tight, secure fit.
6. Seal the Joints
Apply a high-quality sealant to the joints between the hip cap, trim, and standing seam panels. This helps to create a watertight seal and prevents water infiltration. Ensure that the sealant is applied evenly and that there are no gaps or voids.
7. Inspect the Installation
After completing the installation, thoroughly inspect the hip detail to ensure that everything is in place and properly secured. Check for any signs of gaps, misalignment, or loose fasteners. Address any issues promptly to ensure the integrity of the roof.
Best Practices for Maintaining the Standing Seam Metal Roof Hip Detail
Proper maintenance is key to ensuring the longevity and performance of the standing seam metal roof hip detail. Here are some best practices to follow:
1. Regular Inspections
Conduct regular inspections of the roof, focusing on the hip detail and surrounding areas. Look for any signs of damage, wear, or leaks. Address any issues promptly to prevent further damage.
2. Clean the Roof
Keep the roof clean and free from debris. Remove leaves, branches, and other materials that could obstruct the flow of water or cause damage to the roof. Use a soft brush or leaf blower to avoid scratching the metal panels.
3. Check for Rust
Inspect the metal panels and hip detail for any signs of rust or corrosion. If rust is detected, clean the affected areas and apply a rust-inhibiting primer and paint to prevent further deterioration.
4. Maintain Sealants
Periodically check the sealants applied around the hip detail. Reapply or touch up sealants as needed to ensure that the joints remain watertight.
5. Address Damage Promptly
If you notice any damage to the hip detail or other parts of the roof, address it promptly to prevent further issues. Repair or replace damaged components as necessary to maintain the roof’s performance and appearance.
Conclusion
The Standing Seam Metal Roof Hip Detail is a crucial component of a metal roofing system, providing both functional and aesthetic benefits. By understanding its importance and following proper installation and maintenance practices, you can ensure a durable, watertight, and visually appealing roof. Whether you’re installing a new roof or maintaining an existing one, attention to detail and adherence to best practices will help you achieve a superior roofing solution.
By mastering the Standing Seam Metal Roof Hip Detail, you can enhance the performance, longevity, and appearance of your roof, ensuring that it serves you well for years to come.


Leave a Reply