Attaching a porch roof securely to your home starts with the ledger board, which acts as the main support connecting the roof to your house. If you’re unsure how to handle porch roof attaching ledger board to house for roof, improper installation can lead to leaks, structural issues, or safety hazards. Following a proper process ensures durability, stability, and weather protection for your porch.
Materials and Tools Needed
Materials:
- Pressure-treated ledger board (typically 2×8 or 2×10)
- Lag bolts or structural screws
- Flashing and waterproof sealant
- Roof beams and rafters
Read too: How To Replace Roof Shingles That Blew Off: A Comprehensive Guide
Tools:
- Drill with masonry and wood bits
- Level and measuring tape
- Circular saw or handsaw
- Ladder or scaffolding
- Safety gear (gloves, goggles, helmet)
Expert Tip: Always check your local building codes before attaching a ledger board to ensure compliance and safety (Wikipedia).
Step-By-Step Process
1. Plan and Measure
- Determine porch width, roof overhang, and attachment height
- Mark ledger board location along the house wall
- Locate wall studs to anchor securely
2. Prepare the House Wall
- Remove siding in the area of the ledger
- Inspect wall for damage or rot
- Install flashing to prevent water infiltration
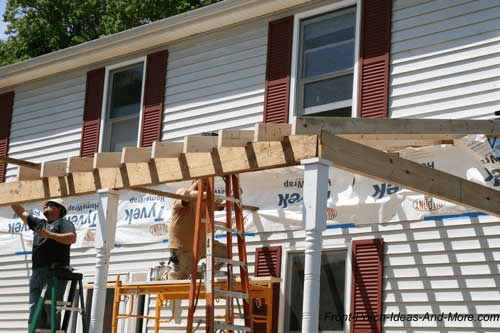
3. Attach the Ledger Board
- Align the board level along marked location
- Drill pilot holes into studs or masonry
- Secure using lag bolts or structural screws
- Ensure tight fit and proper leveling
4. Install Roof Supports
- Set vertical posts at porch corners
- Attach beams to ledger and posts
- Place rafters perpendicular to beams for roof panels
5. Complete the Roof
- Install roof panels (metal, shingles, polycarbonate)
- Check water drainage slope (recommended 2–4 inches per foot)
- Seal edges with caulking to prevent leaks
Common Mistakes to Avoid
- Skipping flashing: Leads to leaks and rot
- Not securing to studs: Reduces load-bearing strength
- Ledger not level: Roof may sag over time
- Using improper fasteners: Avoid nails; use structural screws or lag bolts
Comparison Table: DIY vs Professional Ledger Installation
| Factor | DIY | Professional |
|---|---|---|
| Cost | $100 – $500 | $400 – $1,200 |
| Time | 1–2 days | 0.5–1 day |
| Complexity | Moderate | Low |
| Warranty | None | Often included |
| Safety | User-dependent | High |
Safety Considerations
- Always wear protective gear
- Avoid working on ladders in wet or windy conditions
- Ensure proper support for beams before roof installation
- Verify structural integrity with a level and plumb line
FAQ
Q1: Can I attach a ledger board to brick or stucco walls?
A1: Yes, but use masonry anchors or lag shields and pre-drill holes carefully.
Q2: How high should the ledger board be installed?
A2: Typically aligned with the top of your porch roof framing and leveled precisely to support rafters.
Q3: Do I need flashing?
A3: Yes, flashing protects your home from leaks where the ledger meets the house wall.
Q4: Can I install the ledger board myself?
A4: Yes, if you follow safety guidelines and proper structural support. For larger porches, consider a professional.
Q5: What’s the ideal lumber for a ledger board?
A5: Pressure-treated 2×8 or 2×10 is recommended to resist rot and handle roof load.
Conclusion
Understanding porch roof attaching ledger board to house for roof is crucial for a safe and durable porch. By following step-by-step instructions, using the right materials, and prioritizing safety, you can create a stable structure that enhances your home’s outdoor space.
Share this guide with friends planning a porch upgrade—they’ll benefit from the clear instructions and expert tips!


Leave a Reply