Adding a gable porch roof is one of the most effective ways to improve curb appeal, protect your entryway, and increase usable outdoor space. However, many homeowners struggle with how to attach a gable porch roof to house safely without causing leaks, structural damage, or code violations.
This guide explains the process step by step, using clear language, practical measurements, and proven construction methods so even beginners can understand the fundamentals.
Why Properly Attaching a Gable Porch Roof Matters
Attaching a gable porch roof incorrectly can lead to serious long-term problems. These issues often appear months or even years later, making repairs expensive.
Common Problems Caused by Improper Attachment
- Water intrusion behind siding
- Roof sagging or structural failure
- Ice dam formation in cold climates
- Failed building inspections
- Voided homeowner insurance claims
Read too: How To Replace Roof Shingles That Blew Off: A Comprehensive Guide
A properly attached gable porch roof transfers loads safely, integrates with the existing roof system, and creates a weather-tight seal that lasts decades.
What Is a Gable Porch Roof?
A gable porch roof features two sloping sides that meet at a ridge, forming a triangular shape at each end. This design is popular in the United States because it:
- Matches most residential roof styles
- Allows excellent water runoff
- Provides better ventilation than shed roofs
- Looks architecturally balanced
Unlike a flat or shed porch roof, a gable roof requires precise alignment with the house’s framing.
Do You Need a Permit to Attach a Gable Porch Roof?
In most US jurisdictions, yes.
According to residential building standards, any structural modification connected to the main house typically requires a permit. This ensures compliance with:
- Wind load requirements
- Snow load calculations
- Proper ledger attachment
- Roof flashing standards
You can review general structural requirements on Wikipedia’s overview of roof construction here:
https://en.wikipedia.org/wiki/Roof
Always check with your local building department before starting construction.
Tools and Materials You Will Need
Essential Tools
- Circular saw (7¼ inch blade)
- Level (24–48 inches)
- Framing square
- Hammer or framing nailer
- Drill with masonry and wood bits
- Caulking gun
Core Materials
- Pressure-treated ledger board (2×8 or 2×10)
- Galvanized lag bolts (½ inch diameter)
- Structural screws (rated for ledger use)
- Roof rafters (2×6 or 2×8 depending on span)
- Ridge board
- Metal flashing (Z-flashing and step flashing)
- Roofing underlayment
- Matching shingles
Using pressure-treated lumber is critical anywhere wood contacts masonry or exterior walls.
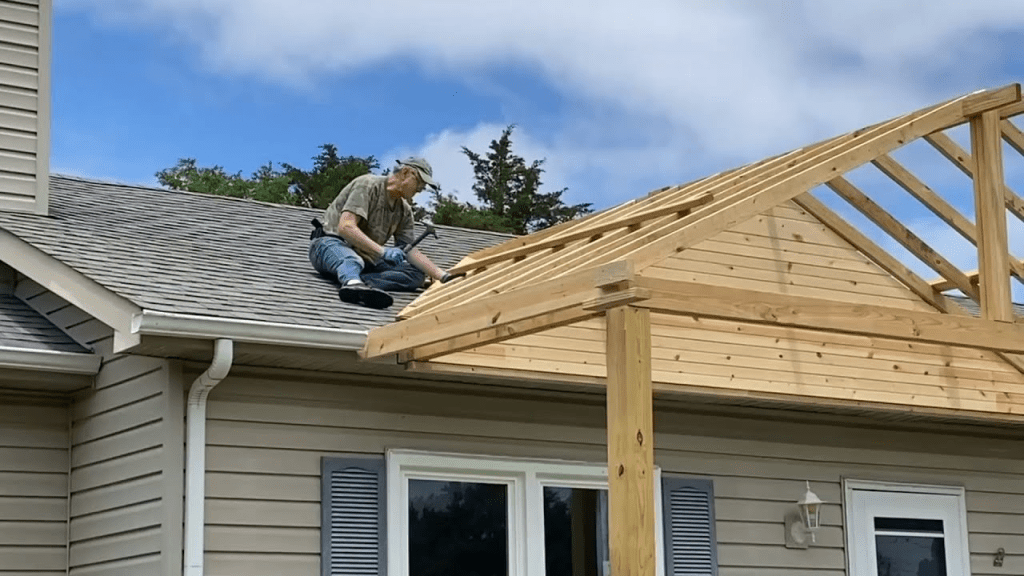
How To Attach A Gable Porch Roof To House (Step-by-Step Guide)
Step 1: Locate the Structural Attachment Point
Never attach a porch roof only to siding.
You must fasten the porch roof to:
- The house rim joist, or
- A wall stud or header behind the siding
How to Find It
- Remove a strip of siding where the ledger board will mount
- Use a stud finder to confirm framing locations
- Verify framing depth (minimum 1½ inches of solid wood)
This step determines the entire roof’s strength.
Step 2: Install the Ledger Board
The ledger board supports the inner end of the porch rafters.
Ledger Board Installation Details
- Height must align with the desired roof pitch
- Common pitch: 4:12 to 6:12
- Board size: 2×8 for spans under 8 feet; 2×10 for larger spans
Fastening Method
- Use ½-inch lag bolts
- Spacing: 16 inches on center
- Embed bolts at least 2½ inches into framing
Apply exterior-grade sealant behind the ledger before fastening.
Step 3: Install Proper Flashing (Critical Step)
Most porch roof failures occur due to poor flashing.
Flashing Layers (Top to Bottom)
- Self-adhesive waterproof membrane
- Metal Z-flashing over ledger
- House wrap overlapping flashing
- Siding reinstalled over wrap
This layered approach directs water away from the wall, not into it.
Step 4: Set Porch Posts and Beam
The outer portion of the gable roof must be independently supported.
Post Requirements
- Minimum size: 6×6 pressure-treated posts
- Set on concrete footings
- Footing depth: 36–48 inches depending on frost line
Beam Installation
- Double 2×8 or engineered beam
- Secured with through-bolts (½ inch)
The beam must be perfectly level before proceeding.
Step 5: Install the Ridge Board
The ridge board connects the two sloping roof planes.
Key Ridge Board Rules
- Must align with house roof centerline
- Supported by gable end framing or ridge posts
- Minimum size equals rafter depth (e.g., 2×8 ridge for 2×8 rafters)
Use temporary bracing to keep it plumb during installation.
Step 6: Cut and Install Rafters
Rafters transfer roof loads to the ledger and beam.
Rafter Layout
- Spacing: 16 inches on center
- Birdsmouth cut for beam seating
- Ridge cut must match roof pitch precisely
Secure rafters using:
- Hurricane ties at beam
- Structural screws at ledger
- Toe-nailing at ridge
Step 7: Sheathing and Roofing Integration
Once framing is complete:
- Install ½-inch roof sheathing
- Apply roofing underlayment
- Install step flashing where porch roof meets house roof
- Shingle from bottom upward
Shingles should overlap the house roof by at least 6 inches.
Gable Porch Roof vs Shed Roof (Comparison Table)
| Feature | Gable Roof | Shed Roof |
|---|---|---|
| Appearance | Classic | Modern |
| Water Drainage | Excellent | Moderate |
| Ventilation | Better | Limited |
| Construction Difficulty | Higher | Lower |
| Long-Term Durability | High | Medium |
Common Mistakes to Avoid
- Attaching ledger to siding only
- Skipping flashing behind ledger
- Using untreated lumber outdoors
- Ignoring snow load calculations
- Under-sized footings
Avoiding these mistakes significantly increases roof lifespan.
How Long Does Installation Take?
For a typical homeowner:
- Planning & permits: 1–2 weeks
- Framing: 2–3 days
- Roofing & flashing: 1–2 days
Total project time averages 4–6 working days.
Cost Breakdown (Average US Estimates)
| Item | Cost Range |
|---|---|
| Lumber | $800–$1,500 |
| Roofing materials | $300–$700 |
| Hardware & flashing | $150–$300 |
| Permits | $100–$250 |
| Total DIY Cost | $1,350–$2,750 |
Hiring a contractor typically doubles the cost.
FAQ – Gable Porch Roof Installation
Q1: Can I attach a gable porch roof without removing siding?
No. Proper attachment requires direct fastening to structural framing behind the siding.
Q2: What roof pitch works best for a porch?
A pitch between 4:12 and 6:12 offers the best balance of drainage and appearance.
Q3: Do I need engineering approval?
In high snow or wind zones, structural calculations may be required.
Q4: Can a gable porch roof match my existing roof?
Yes, matching pitch, shingles, and fascia creates a seamless appearance.
Q5: Is a gable porch roof better than a flat roof?
Yes. Gable roofs drain water better and last longer in most climates.
Conclusion
Learning how to attach a gable porch roof to house correctly is essential for safety, durability, and long-term value. When done right, a gable porch roof enhances both function and appearance while protecting your home from the elements.
If you found this guide helpful, share it on social media to help other homeowners build smarter, safer porch roofs.


Leave a Reply