If you’re researching How To Install A Roof Vent This Old House, you’re likely trying to improve attic ventilation, reduce heat buildup, or prevent moisture damage. Proper roof ventilation plays a critical role in protecting your home’s structure, lowering energy bills, and extending roof lifespan.
This complete guide walks you through the tools, preparation, installation process, and common mistakes to avoid—so you can install a roof vent safely and correctly.
Why Is Roof Ventilation Important?
Before learning How To Install A Roof Vent This Old House, it’s important to understand why ventilation matters.
Proper attic ventilation helps:
- Prevent moisture accumulation
- Reduce mold growth
- Lower attic temperatures
- Protect shingles from premature aging
- Improve HVAC efficiency
According to building science research, poorly ventilated attics can reach 150°F or higher during summer. This heat accelerates shingle deterioration and increases cooling costs.
Read too: Is It Reasonable to Ask the Seller to Replace the Roof?
For general background on ventilation systems, visit:
https://en.wikipedia.org/wiki/Ventilation_(architecture)
What Types of Roof Vents Can You Install?
When considering How To Install A Roof Vent This Old House, choose the correct vent type for your roof structure.
Common Vent Types:
- Static Roof Vent (Box Vent)
- No moving parts
- Affordable and easy to install
- Ridge Vent
- Installed along roof peak
- Provides continuous ventilation
- Powered Attic Vent
- Electric or solar powered
- Higher airflow capacity
- Turbine Vent
- Wind-powered spinning vent
Static box vents are often best for DIY installation.
Tools and Materials Needed
Before starting, gather:
Materials:
- Roof vent unit
- Roofing nails (galvanized)
- Roofing cement or sealant
- Underlayment patch
- Flashing (if not integrated)
Tools:
- Tape measure
- Chalk line
- Reciprocating saw
- Utility knife
- Pry bar
- Hammer
- Safety harness
- Ladder stabilizer
Safety equipment is essential when working on the roof.
Step-by-Step: How To Install A Roof Vent This Old House
Follow this detailed installation process carefully.
Step 1: Identify Vent Location
Choose a location:
- Near the roof peak
- Between rafters
- At least 24 inches below ridge
Mark the center point from inside the attic by drilling a small pilot hole through the roof deck.
Step 2: Outline the Vent Opening
On the roof surface:
- Remove surrounding shingles carefully.
- Position vent over pilot hole.
- Trace vent flange outline.
- Mark opening area.
Double-check measurements before cutting.
Step 3: Cut the Roof Opening
Using a reciprocating saw:
- Cut along marked lines.
- Avoid cutting rafters.
- Remove decking piece.
- Clear debris.
Ensure opening matches vent specifications.
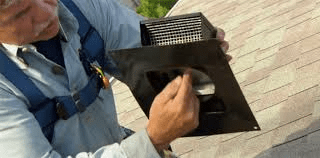
Step 4: Install the Vent
- Slide vent flashing under upper shingles.
- Position bottom flange over lower shingles.
- Secure with galvanized roofing nails.
- Nail along sides and top—never through bottom flange.
Proper flashing placement prevents leaks.
Step 5: Seal and Replace Shingles
- Apply roofing cement under nail heads.
- Reinstall removed shingles.
- Trim shingles as needed to fit around vent.
- Seal edges carefully.
Waterproofing is critical to prevent roof damage.
How Many Roof Vents Do You Need?
Ventilation requirements vary by attic size.
General rule:
- 1 square foot of ventilation per 150 square feet of attic space
- Split evenly between intake and exhaust vents
Example:
- 1,500 sq ft attic requires approximately 10 sq ft ventilation area
Balanced airflow improves efficiency.
Signs You Need a Roof Vent
You may need to install a roof vent if:
- Attic feels excessively hot
- Mold or mildew appears
- Ice dams form in winter
- Shingles age prematurely
- Energy bills rise unexpectedly
Proper ventilation protects long-term structural integrity.
Common Mistakes to Avoid
When learning How To Install A Roof Vent This Old House, avoid these errors:
- Cutting into rafters
- Failing to use flashing properly
- Installing vent too low on roof
- Skipping sealant application
- Working in wet conditions
Precision ensures leak prevention.
Safety Considerations
Roof work involves significant risk.
Always:
- Use safety harness
- Work on dry day
- Avoid steep pitches without proper equipment
- Keep tools secured
- Have a helper present
Falls are a leading cause of home improvement injuries.
Cost Breakdown
Average cost estimates:
- Static vent: $20–$50 per unit
- Powered vent: $100–$300
- Professional installation: $200–$600
DIY installation can save labor costs but requires caution.
Case Study: Improved Attic Temperature
A homeowner installed two static box vents on a 1,200 sq ft attic.
Before installation:
- Summer attic temperature: 145°F
After installation:
- Reduced to 115°F
- Improved cooling efficiency
- Lowered energy costs
Ventilation significantly enhanced comfort.
Pros vs Cons of DIY Roof Vent Installation
Advantages
✔ Lower cost
✔ Quick improvement in airflow
✔ Immediate attic benefits
Limitations
❌ Safety risks
❌ Potential for leaks if misinstalled
❌ Requires roofing experience
Complex roof designs may require professional assistance.
Frequently Asked Questions (FAQ)
How To Install A Roof Vent This Old House without causing leaks?
Ensure proper flashing placement under upper shingles and seal nail heads with roofing cement.
Can I install a roof vent without removing shingles?
No. You must lift or remove surrounding shingles to properly insert flashing.
How long does installation take?
Typically 1–3 hours per vent for experienced DIYers.
Do I need both intake and exhaust vents?
Yes. Balanced ventilation requires both.
Is powered ventilation better than static vents?
Powered vents move more air but require electricity and higher cost.
Conclusion
Understanding How To Install A Roof Vent This Old House empowers homeowners to improve attic ventilation, protect roofing materials, and enhance overall energy efficiency. With proper tools, careful measurement, and correct flashing installation, roof vent installation can be completed safely and effectively.
Take your time, prioritize safety, and ensure watertight sealing. If this guide helped you plan your ventilation project, consider sharing it with other homeowners looking to improve their attic airflow and roof performance.


Leave a Reply