Flashing is a critical component in roofing systems, especially for metal roofs, where proper installation is key to preventing water leaks and ensuring longevity. If you’re tackling a roofing project or maintaining an existing metal roof, understanding how to flash a metal roof is essential. This guide will walk you through the process, providing detailed instructions and tips for achieving a waterproof and durable roof.
Understanding Roof Flashing
Before diving into the specifics of flashing a metal roof, it’s important to understand what roof flashing is and why it’s crucial. Flashing is a material used to direct water away from vulnerable areas on the roof, such as joints, seams, and around penetrations like vents, chimneys, and skylights. On metal roofs, flashing helps prevent water from infiltrating beneath the panels and causing damage.
Key Functions of Flashing
- Directing Water Flow: Flashing channels water away from joints and seams, preventing it from seeping under the roof panels.
- Preventing Leaks: Properly installed flashing minimizes the risk of leaks at critical points, extending the roof’s lifespan.
- Enhancing Durability: Flashing protects the underlying roofing materials from water damage and deterioration.
Read too: How To Replace A Mobile Home Roof: Step-by-Step Guide for Homeowners
Types of Flashing for Metal Roofs
When learning how to flash a metal roof, it’s essential to choose the right type of flashing. Here are some common types used in metal roofing systems:
1. Step Flashing
Step flashing is used at roof-to-wall intersections. It involves a series of overlapping, L-shaped pieces that direct water down the roof and into the gutters.
2. Continuous Flashing
Continuous flashing, also known as counter flashing, is used along roof valleys and other long, continuous areas. It provides a consistent barrier against water infiltration.
3. Pipe Flashing
Pipe flashing is used around pipes and vents that penetrate the roof. It typically consists of a rubber or metal sleeve that seals around the pipe to prevent leaks.
4. Valley Flashing
Valley flashing is installed in the valleys where two roof sections meet. It helps direct water flow and prevent accumulation in these low areas.
How To Flash A Metal Roof: Step-by-Step Guide
Flashing a metal roof requires precision and attention to detail. Here’s a comprehensive guide on how to flash a metal roof effectively:
1: Gather Your Materials
Before you start, make sure you have all the necessary materials and tools:
- Flashing Material: Choose the appropriate type based on the area you are working on (e.g., step flashing, continuous flashing).
- Metal Roofing Panels: Ensure you have the correct panels for your roof.
- Sealant: Use a high-quality roofing sealant or silicone.
- Tools: You will need a hammer, nails or screws, a utility knife, a chalk line, and a measuring tape.
2: Prepare the Area
Preparation is key to a successful flashing installation:
- Clean the Roof Surface: Remove any debris, old flashing, or roofing material from the area where you will be installing new flashing.
- Inspect the Roof: Check for any damage or issues that need to be addressed before installing flashing.
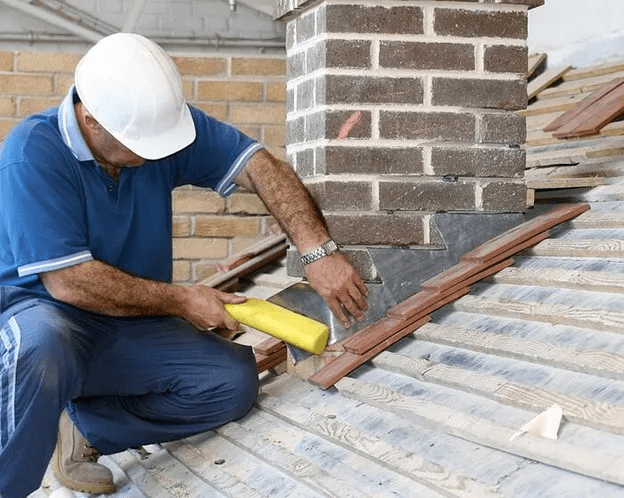
3: Install Step Flashing
- Position the Flashing: Place the step flashing along the roof-to-wall intersection, ensuring that each piece overlaps the one below it.
- Secure the Flashing: Use roofing nails or screws to secure each piece of flashing to the roof. Make sure they are properly fastened without damaging the flashing.
- Seal the Joints: Apply a high-quality roofing sealant between overlapping pieces to prevent water infiltration.
4: Install Continuous Flashing
- Measure and Cut: Measure the length of the area where the continuous flashing will be installed and cut the flashing to size.
- Position the Flashing: Place the continuous flashing along the roof valley or other continuous areas, ensuring it extends up the wall or other surfaces.
- Secure and Seal: Fasten the flashing to the roof and apply sealant along the edges and seams to ensure a watertight seal.
5: Install Pipe Flashing
- Position the Flashing: Place the pipe flashing around the pipe or vent, ensuring that it covers the pipe base and extends up the sides.
- Secure the Flashing: Fasten the flashing to the roof and the pipe, making sure it is tightly sealed.
- Seal the Edges: Apply sealant around the base of the pipe flashing to prevent water from getting underneath.
6: Install Valley Flashing
- Place the Flashing: Position the valley flashing in the roof valleys, ensuring it overlaps the adjacent roof panels.
- Secure and Seal: Fasten the flashing in place and apply sealant to the edges and seams to prevent leaks.
7: Inspect and Test
- Check for Gaps: Inspect all flashing installations to ensure there are no gaps or areas where water could potentially infiltrate.
- Test for Leaks: If possible, test the roof by applying water to the areas with new flashing to ensure there are no leaks.
Tips for Effective Flashing Installation
Here are some additional tips to help you achieve a successful flashing installation:
- Follow Manufacturer Instructions: Always refer to the manufacturer’s instructions for the flashing material you are using.
- Use Quality Materials: Investing in high-quality flashing and sealants will enhance the durability and effectiveness of your installation.
- Maintain Proper Overlaps: Ensure that all flashing pieces overlap appropriately to direct water flow effectively.
- Regular Maintenance: Regularly inspect and maintain your flashing to address any issues before they become major problems.
Common Mistakes to Avoid
When learning how to flash a metal roof, be aware of these common mistakes:
- Inadequate Overlaps: Failing to properly overlap flashing pieces can lead to water infiltration.
- Improper Sealant Use: Not using enough sealant or applying it incorrectly can result in leaks.
- Neglecting Roof Maintenance: Regular maintenance is essential to prevent issues with flashing and other roof components.
Conclusion
Properly flashing a metal roof is essential for preventing water damage and ensuring the longevity of your roofing system. By following the steps outlined in this guide and avoiding common mistakes, you can effectively flash your metal roof and protect your home from leaks and other issues. Whether you’re undertaking a new roofing project or maintaining an existing roof, understanding how to flash a metal roof is a valuable skill for any homeowner or contractor.


Leave a Reply