Transforming your miniature world into a winter wonderland is a fun and rewarding DIY project, and one of the best finishing touches is snow on the rooftop. If you’re wondering how to apply fake snow to roof of doll house, you’ve come to the right place. Whether you’re preparing for the holidays, setting up a cozy scene for your miniature village, or enhancing a themed display, adding fake snow can make your dollhouse look festive, detailed, and truly enchanting.
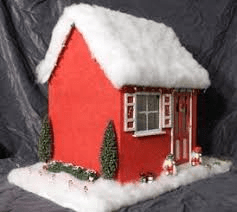
In this complete guide, you’ll learn how to apply fake snow to roof of doll house using various techniques, materials, and safety tips. This tutorial is designed to help both beginners and experienced crafters create a realistic snowy effect, while preserving the beauty and structure of their dollhouse.
Read too: Hail Damage Roof Repair: Essential Guide to Restoring Your Home’s Protection
Why Add Fake Snow to a Dollhouse Roof?
Before we dive into the how, let’s look at the why. Applying fake snow to your dollhouse has both aesthetic and thematic benefits:
- Seasonal Decor: Adds festive winter charm perfect for holiday displays.
- Realism: Enhances the authenticity of your miniature scenes.
- Photography: Creates a picturesque background for miniature photo shoots.
- Creative Expression: Gives you a chance to explore texture, layering, and visual storytelling.
Whether your dollhouse is part of a collectible set or a child’s imaginative play, snow on the rooftop instantly elevates its charm.
Materials Needed to Apply Fake Snow
Here are some commonly used materials that you can choose from depending on the type of finish you want:
Popular Types of Fake Snow:
- Spray snow: Comes in aerosol cans and offers fast application.
- Polyester fiber snow: Fluffy and lightweight, ideal for soft layering.
- Baking soda and glue mix: Great for textured, permanent snow.
- Craft snow paste or modeling paste: Offers a thick, paint-like snow layer.
- Epsom salts or glitter snow: Adds sparkle and realism.
- Flocking powder: Fine-textured snow great for even coats.
Other Tools and Supplies:
- Hot glue gun or craft glue
- Paintbrushes or sponge applicators
- Masking tape (to protect areas)
- Tweezers (for detail work)
- Protective sheet or drop cloth (to catch spills)
- Gloves and mask (for aerosol products)
How To Apply Fake Snow To Roof Of Doll House — Step-by-Step Instructions
Adding fake snow may sound simple, but doing it right requires technique. Below is a step-by-step breakdown of how to apply fake snow to roof of doll house using different materials and methods:
Method 1: Using Spray Snow
Best For: Quick, temporary applications; soft, frosty look.
Steps:
- Prepare the Workspace: Lay down newspaper or a drop cloth to protect your surfaces.
- Mask Off Areas: Use painter’s tape or masking tape to protect windows, shingles, or any area you don’t want to cover in snow.
- Shake the Can: Shake the aerosol spray well.
- Apply Snow: Hold the can 10–12 inches from the dollhouse roof and spray lightly in short bursts.
- Let It Dry: Leave it untouched for 1–2 hours to dry completely.
Tips:
- Best done outdoors or in a well-ventilated area.
- Can be wiped off if you want a temporary display.
Method 2: Using Baking Soda and Glue
Best For: Permanent, textured snow effect.
Steps:
- Mix Ingredients: In a bowl, combine white school glue with baking soda (ratio: 1 part glue to 2 parts baking soda).
- Apply to Roof: Use a palette knife, spoon, or stiff brush to spread the mixture evenly across the roof.
- Create Texture: Tap with a brush or sponge to make snow peaks or a fluffy look.
- Optional Sparkle: While wet, sprinkle with white glitter or Epsom salt.
- Dry: Let dry for 12–24 hours.
Tips:
- Provides a thick, natural snow look.
- Ideal for rooftops with shingles or tile textures.
Method 3: Using Craft Snow Paste
Best For: Sculpting realistic snowdrifts and icicles.
Steps:
- Apply Paste: Use a paintbrush or putty knife to spread snow paste directly on the dollhouse roof.
- Add Depth: Build up certain areas like corners or eaves to mimic snow piles.
- Detail Work: Use a toothpick to shape icicles or snow drips.
- Decorate: Dust with glitter or white paint while wet for extra sparkle.
- Let Cure: Allow to dry based on manufacturer instructions.
Tips:
- Highly durable and long-lasting.
- Excellent for miniature photography setups.
Method 4: Using Polyester Fiber Snow
Best For: Soft, fluffy snow with a temporary finish.
Steps:
- Glue Base: Apply a thin layer of glue or spray adhesive to the roof.
- Place Snow: Gently pull apart the fiber snow and lay it on top of the glued surface.
- Shape: Use tweezers to shape around chimneys, shingles, or windows.
- Secure Edges: Add extra glue around the borders to prevent movement.
Tips:
- Safe and clean, good for kid-friendly displays.
- Can be removed or repositioned easily.
Method 5: Using Flocking Powder or Glitter
Best For: A fine snow-dusted effect.
Steps:
- Apply Adhesive: Brush clear-drying glue across the roof surface.
- Dust Powder: Gently shake flocking powder or ultra-fine glitter over the glue.
- Shake Off Excess: Tap the roof lightly to remove loose particles.
- Seal (Optional): Use a clear spray sealant for longer-lasting results.
Tips:
- Creates a professional, subtle look.
- Works well on smooth or detailed roofs.
Creative Ideas for a Winter-Themed Dollhouse
Once you’ve mastered how to apply fake snow to roof of doll house, take your miniature winter wonderland to the next level with these ideas:
- Add LED mini string lights to the roofline or windows.
- Create miniature icicles using hot glue or clear craft glue.
- Place snow-covered trees and shrubs around the exterior.
- Build a snowy front yard using white felt or cotton batting.
- Add footprints or sled tracks in snow for a story-like scene.
These finishing touches add personality and realism to your miniature display.
Safety Tips When Applying Fake Snow
- Always work in a well-ventilated area, especially when using sprays or sealants.
- Wear gloves and a mask when working with aerosols or powders.
- Keep materials out of reach of children and pets.
- Test any material on a small area first to avoid staining or damage.
Maintenance and Storage of Snow-Covered Dollhouses
If you’re planning to store your winter-themed dollhouse after the holidays, follow these tips:
- Wrap gently in bubble wrap or soft cloth to protect the snow texture.
- Avoid moisture: Store in a dry, cool environment to prevent mold or glue degradation.
- Use airtight bins to keep dust and bugs out.
- For temporary snow effects, gently remove with a soft brush or damp cloth before storage.
Frequently Asked Questions (FAQ)
Q: Can I use real snow effects like salt or flour?
A: No—real food-based products can attract insects and degrade over time. Stick with craft-safe alternatives.
Q: How long does fake snow last on a dollhouse?
A: It depends on the method. Spray snow can last weeks, while glue-based snow can last for years if stored properly.
Q: Can I repaint the dollhouse after applying snow?
A: Only if the snow material is removable or you’re willing to scrape and repaint from scratch.
Q: Is fake snow safe for kids to use?
A: Some materials like fiber snow and glue-snow mixes are child-safe, but always supervise and avoid aerosols for young kids.
Conclusion
Now that you know how to apply fake snow to roof of doll house, you’re ready to bring a magical, snow-covered touch to your miniature world. Whether you’re decorating for Christmas, creating a cozy winter village, or just exploring your creative side, the right snow application can transform your project from simple to stunning.
With a variety of materials and methods available—from quick spray applications to detailed sculpting—there’s a snow technique for every crafter. Take your time, experiment, and enjoy turning your dollhouse into a winter masterpiece.
Leave a Reply