Adding a tin roof over your porch is an excellent way to increase comfort, protect the area from harsh weather, and enhance curb appeal. However, many homeowners struggle with the practical side of the project: how to correctly attach a porch tin roof to house without leaks, structural issues, or mismatched design.
Attaching a porch tin roof isn’t as simple as fastening metal sheets to beams—it requires planning, correct installation, and attention to waterproofing details. In this guide, we’ll walk you through the process, provide design tips, highlight common mistakes to avoid, and explain how to maintain your new roof for long-lasting performance.
Read too: Is It Reasonable to Ask the Seller to Replace the Roof?
Why a Porch Tin Roof Is a Smart Choice
Tin (or more broadly, metal roofing) has been used for decades thanks to its durability, cost-effectiveness, and timeless look. Here’s why it’s a smart option:
- Durability: Tin roofs can last 40–70 years with proper maintenance.
- Weather Resistance: Excellent against rain, snow, wind, and even hail.
- Low Maintenance: Requires less upkeep compared to asphalt shingles.
- Eco-Friendly: Tin is recyclable and reflects heat, improving energy efficiency.
- Aesthetic Appeal: Works beautifully with rustic, farmhouse, and modern designs.
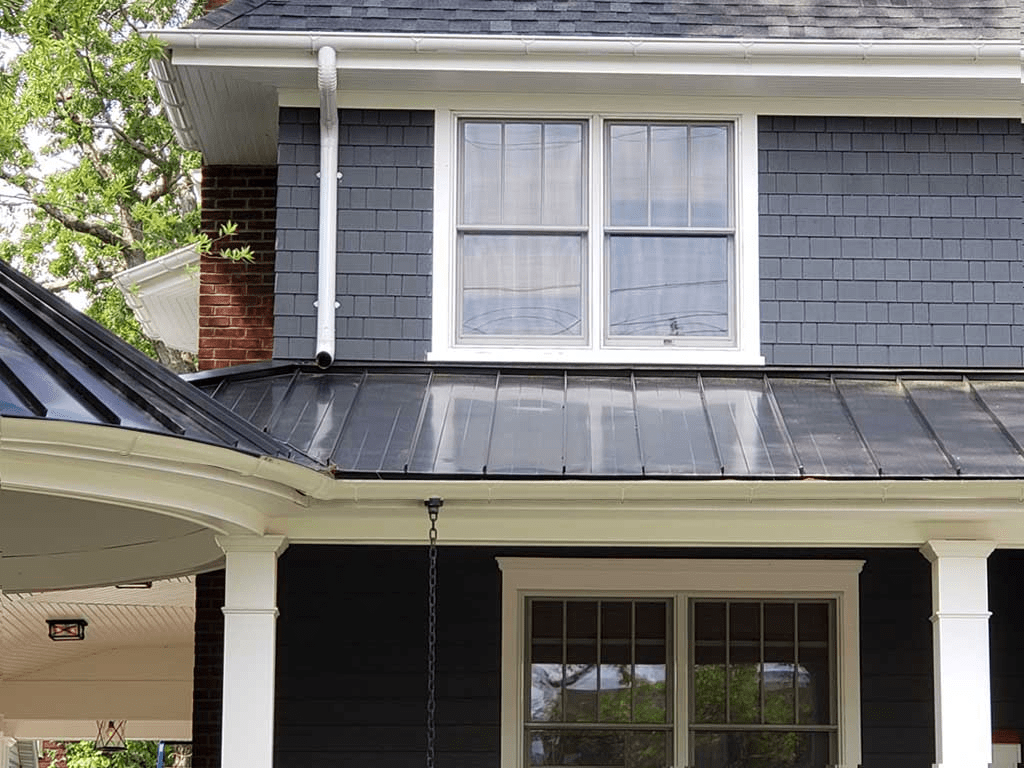
But to fully enjoy these benefits, you need to know how to correctly attach a porch tin roof to house with proper flashing, structural support, and slope.
Key Planning Considerations
Before you begin, take time to plan the project carefully.
- Check Local Building Codes – Some areas require permits or specific attachment methods for metal roofs.
- Evaluate Porch Structure – Posts, beams, and rafters must support the additional weight and withstand wind loads.
- Choose Roof Pitch – A slope of at least 3:12 (3 inches of rise for every 12 inches of run) is recommended for water runoff.
- Select Materials – Decide between classic corrugated tin or modern standing seam panels.
- Waterproofing Strategy – Proper flashing where the tin roof meets the house is crucial to prevent leaks.
Tools and Materials Needed
- Tin roofing panels (corrugated or standing seam)
- Ledger board (if attaching directly to house)
- Galvanized screws with rubber washers
- Metal flashing
- Underlayment (roofing felt or synthetic)
- Circular saw with metal-cutting blade
- Drill/driver
- Safety gear (gloves, goggles, harness)
- Ladder or scaffolding
How To Correctly Attach A Porch Tin Roof To House
Now let’s go step by step through the installation process:
Step 1: Prepare the House Wall and Porch Frame
- Identify where the tin roof will connect to your house.
- If attaching with a ledger board, remove siding in that area.
- Ensure porch posts and beams are level and secure.
Step 2: Install the Ledger Board
- Fasten the ledger board horizontally to the house framing using lag bolts.
- Flash the top of the ledger board with L-shaped metal flashing to prevent water from seeping behind it.
Step 3: Frame the Roof Rafters
- Attach rafters from the ledger board to the porch beam.
- Maintain consistent spacing (typically 16–24 inches apart).
- Ensure the slope meets minimum requirements for water runoff.
Step 4: Install Underlayment
- Cover rafters with sheathing (plywood or OSB).
- Roll out roofing underlayment for added protection against condensation and leaks.
Step 5: Place the Tin Roofing Panels
- Lay panels starting at one corner, working across the roof.
- Overlap each panel by at least one ridge.
- Fasten panels with galvanized screws through the ridges, using rubber washers to seal holes.
Step 6: Flash and Seal the Connection
- Install step flashing where the tin roof meets the house wall or shingles.
- Overlap flashing pieces and secure them tightly.
- Seal edges with roofing cement for extra waterproofing.
Step 7: Finish with Trim and Gutters
- Add metal trim pieces for a polished look.
- Install gutters to direct rainwater away from the porch foundation.
Safety Tips
Working with tin roofing involves sharp edges and heights. Follow these precautions:
- Wear gloves and goggles when cutting tin sheets.
- Use harnesses or fall protection gear when working on elevated areas.
- Avoid installing on windy or rainy days.
- Handle panels carefully to avoid bending or scratching.
Common Mistakes to Avoid
- Skipping Flashing – This almost guarantees water damage over time.
- Incorrect Fastener Placement – Screws should go on ridges, not valleys, to prevent leaks.
- Insufficient Overlap – Panels need enough overlap to shed water properly.
- Wrong Slope – Too flat of a roof leads to pooling and premature rust.
- Poor Material Match – Using low-quality tin can reduce durability and curb appeal.
Design and Style Ideas
Attaching a tin roof doesn’t mean compromising on aesthetics. Some design inspirations include:
- Rustic Farmhouse Look: Pair silver corrugated tin with white posts and dark shutters.
- Modern Industrial Style: Use sleek standing seam tin in matte black.
- Classic Porch Charm: Match the roof color with trim or shutters for a coordinated look.
- Two-Tone Effect: Combine a neutral house roof with a bold porch roof color for contrast.
Cost Breakdown
The price of installing a porch tin roof varies depending on size, materials, and whether you DIY or hire professionals.
- Materials Only (DIY): $2,000–$5,000
- Professional Installation: $6,000–$12,000
- Extras (gutters, skylights, insulation): Additional $500–$2,000
Investing in higher-quality tin panels and proper flashing pays off in long-term durability.
Long-Term Maintenance
A properly attached porch tin roof requires minimal upkeep but still needs attention:
- Inspect Annually: Check for loose screws, rust spots, and damaged flashing.
- Clean Debris: Remove leaves and branches to prevent moisture buildup.
- Re-Seal as Needed: Apply roofing sealant around flashing if cracks appear.
- Repaint or Coat: Use a protective coating every 10–15 years to extend lifespan.
Final Thoughts
Learning how to correctly attach a porch tin roof to house ensures that your project is not only attractive but also structurally sound and weatherproof. The key is proper planning, correct flashing, and careful installation of tin panels.
Whether you tackle it as a DIY project or hire professionals, following the right steps will give you a porch roof that lasts for decades, protects your outdoor space, and enhances the overall beauty of your home.
Leave a Reply