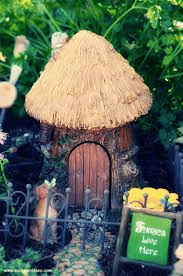
Gardens are not just spaces for plants—they are places to spark imagination and creativity. One whimsical addition that has captured the hearts of gardeners everywhere is gnome houses. If you’ve been asking, “How to create thatched roof gnome houses for the garden?”, you’re in the right place. These miniature homes bring charm, character, and a touch of magic to any outdoor space. This guide provides step-by-step instructions, tips, and inspiration for making your own thatched roof gnome houses.
Read too: How To Replace Roof Shingles That Blew Off: A Comprehensive Guide
Why Thatched Roof Gnome Houses Are a Magical Addition
Adding thatched roof gnome houses to your garden is more than a decorative choice—it creates a storybook feel and engages imagination for children and adults alike. Thatched roofs, in particular, offer a rustic, natural aesthetic that blends beautifully with plants, flowers, and garden landscapes.
Benefits include:
- Whimsical Appeal – Adds charm and fantasy to your garden.
- Natural Materials – Thatch roofs use straw, reeds, or dried grasses, which are eco-friendly.
- Customizable Design – Gnome houses can be small or large, simple or elaborate.
- Durability – Properly crafted thatch can withstand outdoor conditions.
How To Create Thatched Roof Gnome Houses For The Garden
Understanding how to create thatched roof gnome houses for the garden requires both creativity and some basic crafting skills. Follow these detailed steps to make your own enchanting miniature home.
Step 1: Gather Materials
Before starting, collect the necessary materials:
- Wood or Sturdy Cardboard – For the base and walls of the house.
- Straw, Dried Grass, or Reeds – For the thatched roof.
- Hot Glue Gun or Wood Glue – For assembly.
- Small Nails or Pins – To secure roof layers if needed.
- Paints and Brushes – To decorate doors, windows, and walls.
- Miniature Accessories – Such as tiny doors, windows, or fences for added detail.
Step 2: Build the Base and Walls
The first step in how to create thatched roof gnome houses for the garden is constructing the structure:
- Cut the wood or cardboard into panels for the walls and base.
- Assemble the walls into a square or rectangular shape using glue or nails.
- Make sure the base is sturdy enough to support the roof.
- Add any small openings or cut-outs for windows and doors.
Step 3: Construct the Roof Frame
The roof frame supports the thatching. You can make a simple triangular frame or a more complex curved shape:
- Use thin wooden sticks or cardboard to create a triangle or arched frame.
- Ensure the frame is proportional to the house’s walls.
- Attach the frame securely to the walls using glue or small nails.
Step 4: Apply the Thatch Roof
The most distinctive feature of a gnome house is the thatched roof. Here’s how to do it:
- Gather small bundles of straw, reeds, or dried grasses.
- Starting from the bottom edge of the roof, glue or pin the bundles in layers, overlapping each layer for a natural thatched effect.
- Continue layering until the entire roof is covered.
- Trim any excess straw to create a uniform edge.
Step 5: Decorate the House
Once the structure and roof are complete, it’s time to add charm and personality:
- Paint the walls in earthy or whimsical colors.
- Add tiny doors and windows for realism.
- Incorporate miniature garden accessories such as fences, moss pathways, or tiny benches.
- Optional: Add a small figurine gnome for a finished touch.
Step 6: Protect Your Gnome House
To ensure longevity outdoors:
- Seal wood components with a water-resistant finish.
- Treat the thatch lightly with a weatherproofing spray to reduce decay.
- Position the house in a sheltered area to minimize wind and rain damage.
Tips for a Magical Gnome House
- Use Natural Materials – Incorporate twigs, pebbles, or moss for a more authentic look.
- Experiment with Roof Shapes – Curved, pointed, or even layered roofs create unique effects.
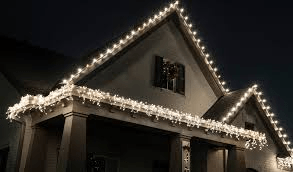
- Add Lighting – Tiny solar lights or LED fairy lights can enhance the magical feel at night.
- Scale and Placement – Vary sizes and place multiple houses for a whimsical gnome village.
- Mix Colors and Textures – Combine different natural materials to add depth and visual interest.
Creative Variations
Once you’ve mastered the basics of how to create thatched roof gnome houses for the garden, consider these variations:
- Fairy Gnome Hybrids – Add miniature bridges, fountains, or toadstools for a fairy-garden effect.
- Seasonal Themes – Decorate with autumn leaves, snow-like cotton for winter, or spring flowers.
- Upcycled Materials – Use old wood, broken tiles, or scrap fabric for a rustic charm.
- Interactive Elements – Make doors that open or attach removable roofs to access the interior.
Benefits Beyond Aesthetics
Creating gnome houses is not just about looks:
- Encourages Creativity – Great craft project for children or adults.
- Educational Opportunity – Learn about construction, layering, and natural materials.
- Enhances Garden Appeal – Adds focal points and whimsy to your landscape.
- Stress Relief – Crafting can be therapeutic and relaxing.
Maintaining Your Thatched Roof Gnome Houses
Proper maintenance ensures your gnome houses last for years:
- Inspect annually for damaged thatch and replace as needed.
- Remove debris such as leaves or dirt buildup.
- Reapply water-resistant coatings if necessary.
- Keep an eye out for pests that might nest in the straw.
Conclusion
Learning how to create thatched roof gnome houses for the garden allows you to bring whimsy, creativity, and charm to any outdoor space. With a combination of basic materials, careful construction, and decorative touches, you can build miniature homes that delight both children and adults. By using natural thatch, securing the roof properly, and adding your own personal flair, your gnome houses can become a lasting feature in your garden.
Whether creating a single house or a miniature gnome village, the process fosters creativity and provides a magical addition to your garden landscape. With attention to detail, imagination, and proper maintenance, your gnome houses will be a charming focal point that sparks joy and wonder for years to come.
Leave a Reply