Slate roofing is renowned for its durability, elegance, and longevity. Installing a slate roof can be a rewarding project that enhances the aesthetic appeal and value of your home. This comprehensive guide will walk you through the process of installing a slate roof, providing you with essential tips, tools, and techniques to ensure a successful installation. Whether you’re a DIY enthusiast or a professional contractor, understanding how to install a slate roof will help you achieve a high-quality finish that stands the test of time.
What Is Slate Roofing?
Slate roofing consists of natural stone tiles, known for their exceptional durability and classic appearance. Slate tiles are cut from metamorphic rock and come in various colors, sizes, and thicknesses. The natural qualities of slate make it a popular choice for both historic and modern buildings due to its ability to withstand harsh weather conditions and its timeless aesthetic.
Read too: How To Replace Roof Shingles That Blew Off: A Comprehensive Guide
Advantages of Slate Roofing
- Longevity: Slate roofs can last over 100 years, making them a long-term investment.
- Durability: Slate is resistant to fire, water, and insects, offering superior protection.
- Aesthetic Appeal: Slate tiles provide a sophisticated and elegant look, available in various colors and textures.
- Low Maintenance: Slate requires minimal maintenance compared to other roofing materials.
Tools and Materials Needed
Before beginning your slate roof installation, gather the necessary tools and materials. Here’s a list to get you started:
Tools
- Roofing Hammer: For nailing and securing slate tiles.
- Slate Cutter: For cutting slate tiles to size.
- Tape Measure: To measure and layout the roofing area.
- Chalk Line: For marking straight lines on the roof.
- Utility Knife: For cutting roofing felt and flashing.
- Roofing Nails: Specifically designed for securing slate tiles.
- Ladder and Scaffolding: For safely accessing the roof.
Materials
- Slate Tiles: Choose high-quality slate tiles appropriate for your climate and design preferences.
- Roofing Felt: Provides a waterproof layer beneath the slate tiles.
- Flashing: Used around roof penetrations and edges to prevent leaks.
- Roof Decking: Usually plywood or OSB that forms the base for the roofing materials.
- Underlayment: Additional layer beneath the slate for added protection.
How To Install A Slate Roof
Installing a slate roof involves several steps, from preparation to finishing touches. Follow these guidelines to ensure a successful installation.
1. Preparation
Inspect the Roof Decking
Before installation, inspect the existing roof decking for any damage or rot. Replace any damaged sections to provide a stable and secure base for the slate tiles.
Remove Old Roofing Materials
If you’re replacing an existing roof, remove old roofing materials, including shingles, underlayment, and flashing. Ensure the roof decking is clean and free from debris.
Plan the Layout
Measure the roof area and plan the layout of the slate tiles. Consider the pattern and alignment to ensure a uniform appearance. Use a chalk line to mark horizontal and vertical lines on the roof decking to guide your installation.
2. Install Roofing Felt
Lay down roofing felt over the entire roof decking. This provides an extra layer of protection against water infiltration. Overlap the edges of the felt by at least 2 inches and secure it with roofing nails or staples.
3. Install Flashing
Install flashing around roof penetrations, such as chimneys and vents, as well as along roof edges. Flashing helps prevent water from seeping beneath the slate tiles. Use roofing cement or sealant to ensure a watertight seal.
4. Begin Slate Installation
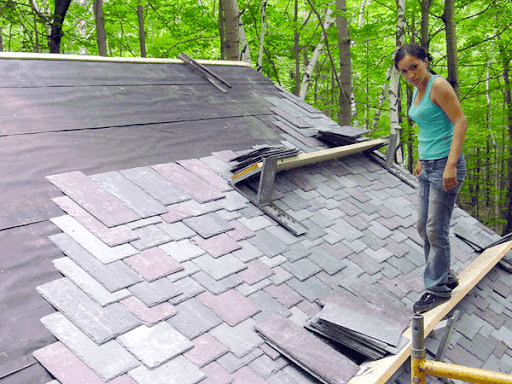
Start at the Bottom
Begin installing slate tiles at the bottom edge of the roof, working your way upward. This ensures that each row of tiles overlaps the row below, preventing water from penetrating the seams.
Secure Slate Tiles
Use a roofing hammer to nail each slate tile in place. Slate tiles are typically nailed with two nails per tile. Ensure the nails are driven into the slate and not the roof decking to avoid cracking.
Cut Slate Tiles as Needed
Use a slate cutter to trim tiles to fit along edges and around roof penetrations. Ensure that the cut tiles fit snugly and maintain a uniform appearance.
5. Install Ridge Caps
Ridge caps are installed along the roof’s peak to cover the top row of slate tiles and provide additional protection. Secure the ridge caps with roofing nails and seal any gaps with roofing cement.
6. Inspect and Finish
Once the installation is complete, inspect the roof for any gaps, loose tiles, or areas that need additional sealing. Make any necessary adjustments and ensure that the entire roof is watertight.
Maintenance and Care
Slate roofs require minimal maintenance, but regular inspections can help prolong their lifespan. Here are some maintenance tips:
1. Regular Inspections
Inspect your slate roof periodically for any damaged or missing tiles. Address any issues promptly to prevent further damage and leaks.
2. Clean Gutters
Keep gutters and downspouts clean and free from debris to ensure proper water drainage and prevent water damage to the roof.
3. Avoid Walking on the Roof
Minimize foot traffic on the roof to prevent damage to the slate tiles. If necessary, use proper safety equipment and techniques when accessing the roof.
4. Address Issues Promptly
If you notice any signs of leaks, cracks, or other issues, address them immediately. Early intervention can prevent more extensive and costly repairs.
Conclusion
Installing a slate roof requires careful planning, attention to detail, and the right tools and materials. By following the steps outlined in this guide, you can achieve a professional-quality installation that enhances the beauty and durability of your home. Whether you’re a DIY enthusiast or a professional roofer, understanding how to install a slate roof will help you create a long-lasting and aesthetically pleasing roofing solution.


Leave a Reply