Kickout flashing is a critical component in roofing that directs water away from the sides of a roof and prevents it from seeping into the walls of a home. Installing kickout flashing is particularly important where the roof meets the wall, as this area is vulnerable to water intrusion, which can lead to serious damage over time. If you’re looking to learn how to install kickout flashing on existing roof systems, this comprehensive guide will walk you through the process step by step.
What is Kickout Flashing?
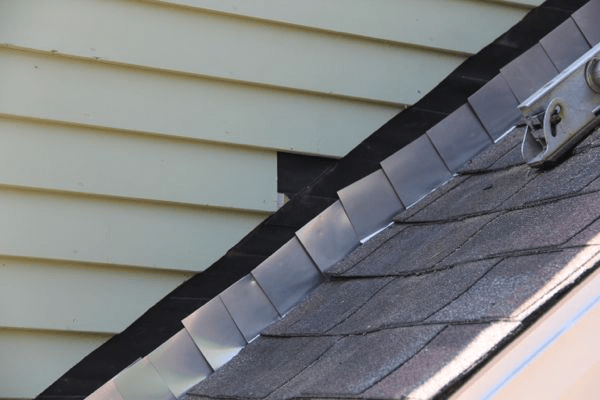
Kickout flashing, also known as diverter flashing, is a specialized type of flashing that is installed at the intersection of a roof and a vertical wall. It is designed to “kick out” water away from the wall and into the gutters or drainage system, preventing water from running down the wall and causing damage. This installation is especially crucial in areas with heavy rainfall or snow.
Why is Kickout Flashing Important?
- Water Management: Kickout flashing helps manage water flow and directs it to appropriate drainage systems, reducing the risk of water pooling and infiltration.
- Preventing Damage: By ensuring that water does not run down the wall, kickout flashing helps prevent damage to the siding, insulation, and framing.
- Longevity of Roofing Materials: Proper water management contributes to the longevity of both the roofing materials and the building structure.
Read too: How To Replace Roof Shingles That Blew Off: A Comprehensive Guide
Tools and Materials Needed
Before you begin the installation process, ensure you have the following tools and materials:
Tools
- Hammer
- Utility knife
- Caulking gun
- Screwdriver or drill
- Measuring tape
- Level
- Safety goggles
Materials
- Kickout flashing (metal or vinyl)
- Roofing nails or screws
- Roofing adhesive or sealant
- Underlayment (if necessary)
- Paint (to match your siding, optional)
How to Install Kickout Flashing on Existing Roof
Step 1: Assess the Area
Begin by inspecting the area where you intend to install the kickout flashing. Check for any existing damage or wear on the roofing and siding materials. If any repairs are needed, address these before proceeding.
Step 2: Gather Measurements
Using your measuring tape, measure the length of the area where the kickout flashing will be installed. This is usually at the intersection of the roof and the wall. Accurate measurements are crucial for cutting the flashing to size.
Step 3: Cut the Kickout Flashing
Using your utility knife, cut the kickout flashing to the measured length. If your kickout flashing is made of metal, ensure your cuts are straight and clean for proper installation.
Step 4: Position the Flashing
Place the cut kickout flashing at the intersection of the roof and wall, ensuring it is positioned to direct water away from the wall. The top edge of the kickout flashing should be under the roofing material, while the bottom edge should extend out over the gutter or drainage area.
Step 5: Secure the Flashing
Using roofing nails or screws, secure the kickout flashing in place. If your flashing is made of metal, ensure that you use corrosion-resistant fasteners to prevent rust. Make sure the flashing is level and properly aligned to facilitate water drainage.
Step 6: Apply Sealant
After securing the flashing, apply a roofing adhesive or sealant around the edges to ensure a watertight seal. This step is critical to prevent water from seeping under the flashing. Use your caulking gun to apply a continuous bead of sealant along the top edge of the kickout flashing, where it meets the roofing material.
Step 7: Install Additional Underlayment (if Necessary)
If the area under the kickout flashing is exposed, consider installing an additional layer of underlayment to enhance water resistance. This can provide an extra layer of protection against water intrusion.
Step 8: Inspect Your Work
After installation, inspect the kickout flashing to ensure that it is properly positioned and sealed. Check for any gaps or areas that may need additional sealant. It’s important to verify that the flashing effectively directs water away from the wall.
Maintenance Tips for Kickout Flashing
Once you’ve installed kickout flashing, regular maintenance is essential to ensure its longevity and effectiveness. Here are some tips to keep your kickout flashing in good condition:
1. Regular Inspections
Conduct periodic inspections, especially after severe weather events. Look for any signs of damage or wear, such as loose flashing or gaps in the sealant.
2. Clear Debris
Ensure that gutters and downspouts are clear of debris, as blockages can lead to overflow and reduce the effectiveness of your kickout flashing.
3. Reapply Sealant
Over time, the sealant used in the installation may degrade. Be sure to reapply sealant as necessary to maintain a watertight barrier.
4. Address Roof Maintenance
Regularly check your roof for missing shingles or other issues that could affect water drainage. Address any roofing problems promptly to ensure the effectiveness of your kickout flashing.
Troubleshooting Common Issues
Even with proper installation, you may encounter issues with your kickout flashing. Here are some common problems and their solutions:
Problem 1: Water Pooling at the Base of the Wall
If you notice water pooling at the base of the wall, it may indicate that the kickout flashing is not directing water properly. Check the alignment of the flashing and adjust it if necessary.
Problem 2: Damaged Flashing
If the kickout flashing becomes bent or damaged, it can compromise its effectiveness. Replace damaged sections promptly to maintain proper water management.
Problem 3: Gaps in Sealant
Over time, sealant may crack or peel. Inspect the sealant regularly and reapply it as needed to prevent water from seeping beneath the flashing.
Conclusion
Knowing how to install kickout flashing on existing roof structures is vital for any homeowner looking to protect their property from water damage. By following the steps outlined in this guide, you can effectively install kickout flashing and enhance the longevity and performance of your roof. Regular maintenance and inspections will ensure that your kickout flashing continues to serve its purpose for many years to come.
By investing time in this installation, you are taking a proactive step toward protecting your home and ensuring a safe and dry living environment.


Leave a Reply