How To Shingle A Hip Roof? Shingling a hip roof is a project that requires careful planning, precision, and a good understanding of roofing techniques. Hip roofs, which have slopes on all four sides, are popular for their aesthetic appeal and stability. This guide will walk you through the steps of shingling a hip roof, from preparation to completion, ensuring that your roof is both durable and visually appealing.
Understanding the Basics of a Hip Roof
What is a Hip Roof?
A hip roof, also known as a hipped roof, is characterized by slopes on all four sides that meet at the top to form a ridge. This design provides excellent stability and is particularly effective in areas prone to high winds and heavy snowfall.
Why Choose a Hip Roof?
- Stability: The sloping sides provide additional structural support.
- Weather Resistance: Hip roofs are more resistant to wind and snow compared to other roof types.
- Aesthetic Appeal: Hip roofs offer a clean, symmetrical look that complements various architectural styles.
Read too: How To Replace A Mobile Home Roof: Step-by-Step Guide for Homeowners
Preparing for the Shingling Process
Materials and Tools Needed
Before you start shingling your hip roof, gather all the necessary materials and tools. These include:
- Asphalt Shingles: Choose high-quality shingles that match your home’s aesthetic.
- Underlayment: Felt paper or synthetic underlayment provides an additional layer of protection against moisture.
- Drip Edge: Metal flashing installed along the edges of the roof to direct water away from the fascia and into the gutters.
- Roofing Nails: Use galvanized nails to prevent rusting.
- Roofing Hammer or Nail Gun: For securing shingles in place.
- Utility Knife: For cutting shingles to size.
- Chalk Line: For marking straight lines on the roof.
- Roofing Caulk: For sealing any gaps and ensuring waterproofing.
- Ladder: Ensure you have a sturdy ladder to access the roof safely.
- Safety Gear: Wear gloves, safety goggles, and non-slip shoes.
Safety Precautions
Working on a roof can be dangerous, so take the following safety precautions:
- Secure Ladder: Ensure the ladder is stable and on a flat surface.
- Use Safety Harness: Wear a safety harness attached to a secure anchor point on the roof.
- Check Weather: Avoid working on the roof in bad weather conditions such as rain, snow, or high winds.
- Work with a Partner: Having someone assist you can enhance safety and efficiency.
Step-by-Step Guide on How to Shingle a Hip Roof
Step 1: Install the Drip Edge
Begin by installing the drip edge along the eaves and rakes of the roof. This metal flashing helps to direct water away from the fascia and into the gutters.
- Measure and Cut: Measure the length of the roof edges and cut the drip edge to fit.
- Secure in Place: Nail the drip edge along the eaves first, then along the rakes, ensuring it overlaps at the corners.
Step 2: Apply the Underlayment
The underlayment provides an additional layer of protection against moisture and helps to prevent leaks.
- Roll Out the Underlayment: Starting at the eaves, roll out the underlayment horizontally across the roof.
- Overlap Layers: Ensure each layer overlaps the previous one by at least 2 inches.
- Secure with Nails: Nail the underlayment in place using roofing nails, making sure it lies flat and smooth.
Step 3: Install Starter Shingles
Starter shingles are placed along the edges of the roof to provide a solid base for the first course of shingles.
- Cut and Position: Cut the starter shingles to size and position them along the eaves.
- Nail in Place: Nail the starter shingles in place, ensuring they overhang the drip edge by about 1/4 inch.
Step 4: Begin Shingling the Field
Now, you can start laying the shingles on the main surface of the roof.
- Start at the Bottom: Begin at the bottom edge of the roof and work your way up.
- Lay the First Course: Position the first row of shingles over the starter shingles, aligning them with the chalk line.
- Nail the Shingles: Secure the shingles with roofing nails, placing four nails per shingle—two near the edges and two in the middle.
- Stagger Joints: For each subsequent row, stagger the joints by cutting half a shingle off the end of the first shingle in each row.
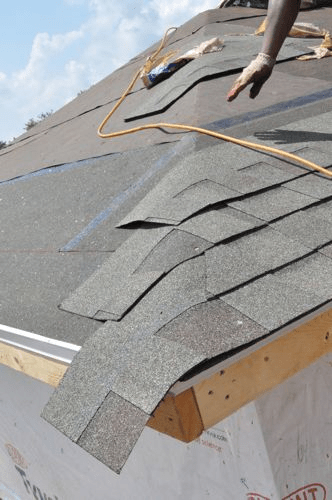
Step 5: Shingle the Hip and Ridge
The hips and ridges require special attention to ensure they are waterproof and properly aligned.
- Cut Hip and Ridge Shingles: Cut standard shingles into hip and ridge shingles by slicing them into thirds along the perforations.
- Install Hip Shingles: Start at the bottom of the hip and work your way up, overlapping each shingle by about 5 inches.
- Install Ridge Shingles: Begin at one end of the ridge and work towards the center, then start from the other end and meet in the middle.
- Nail in Place: Secure each hip and ridge shingle with two nails, ensuring they are covered by the next shingle.
Step 6: Finish with Roofing Cement
To ensure a watertight seal, apply roofing cement to all edges, corners, and around any protrusions such as vents or chimneys.
- Apply Cement: Use a caulk gun or trowel to apply roofing cement under the edges of the last shingles.
- Smooth Out: Smooth out the cement to ensure it forms a seal and doesn’t leave gaps.
Maintenance Tips for Shingled Hip Roofs
Regular Inspections
Regularly inspect your roof for any signs of damage or wear. Look for:
- Missing or Damaged Shingles: Replace any that are missing or damaged.
- Debris Accumulation: Remove leaves, branches, and other debris that can trap moisture.
- Flashing and Seals: Check the flashing and seals around vents and chimneys for signs of wear or damage.
Cleaning the Roof
Keeping your roof clean helps to extend its lifespan.
- Use a Soft Brush: Gently brush away dirt and debris.
- Avoid Pressure Washing: High-pressure washing can damage shingles and remove granules.
- Trim Overhanging Branches: Prevent branches from rubbing against the roof and causing damage.
Addressing Repairs Promptly
If you notice any issues, address them promptly to prevent further damage.
- Replace Missing Shingles: Immediately replace any missing or damaged shingles.
- Seal Leaks: Use roofing cement or other appropriate sealants to fix leaks.
- Professional Inspection: Schedule a professional inspection every few years to ensure your roof is in good condition.
Conclusion
Shingling a hip roof is a project that requires careful planning, the right materials, and precise execution. By following the steps outlined in this guide on “How To Shingle A Hip Roof,” you can ensure that your roof is properly installed and capable of withstanding the elements. Remember to prioritize safety, use high-quality materials, and conduct regular maintenance to keep your roof in excellent condition for years to come.


Leave a Reply