Installing Hurricane Straps on Existing Roof. When it comes to preparing your home for severe weather, particularly hurricanes, strengthening your roof is a critical step. One effective method to enhance your roof’s resilience is by installing hurricane straps. If you’re considering fortifying your home against storms, understanding how to properly install hurricane straps on an existing roof is crucial. This guide provides an in-depth look at the benefits, process, and considerations involved in this important home improvement project.
Why Install Hurricane Straps on Your Roof?
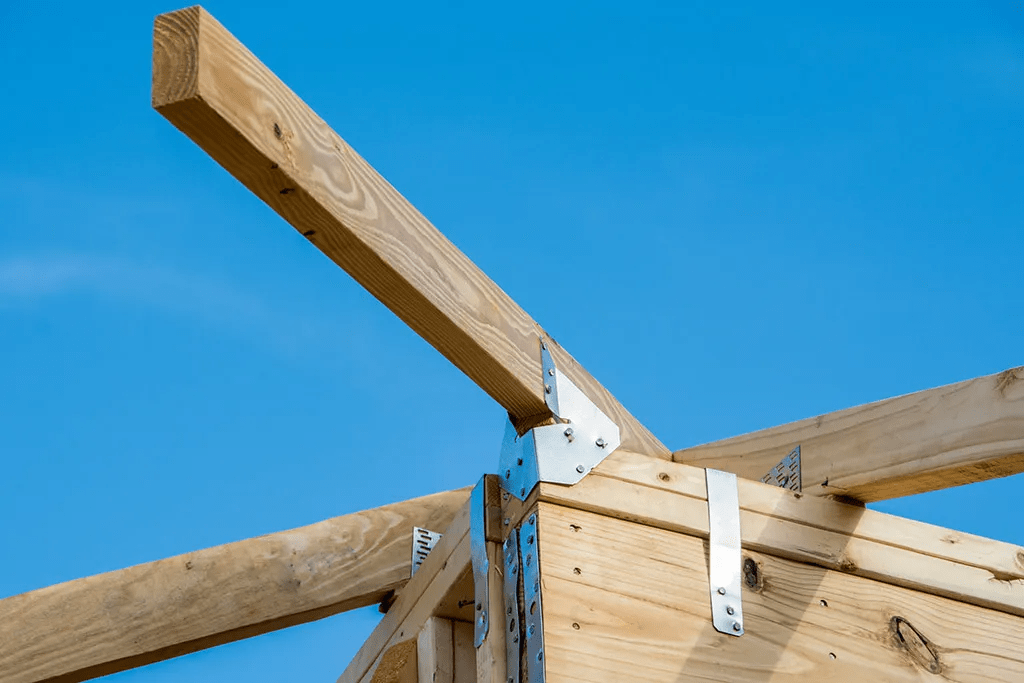
Hurricane straps, also known as hurricane ties or wind straps, are designed to reinforce the connection between your roof and the walls of your home. Their primary purpose is to improve the structural integrity of your house during high winds, reducing the risk of roof failure and minimizing potential damage.
Read too: Is It Reasonable to Ask the Seller to Replace the Roof?
Benefits of Installing Hurricane Straps
- Enhanced Wind Resistance: Hurricane straps help to secure the roof to the walls of the house, preventing the roof from lifting or separating during strong winds. This added strength can be crucial during hurricanes and severe storms.
- Improved Structural Integrity: By reinforcing the connection points, hurricane straps contribute to the overall stability of your home. This can prevent more extensive damage and reduce repair costs after a storm.
- Increased Property Value: Homes equipped with hurricane straps are often considered more valuable in storm-prone areas. Prospective buyers may view these features as added protection and peace of mind.
- Insurance Benefits: Some insurance companies offer discounts on homeowners’ insurance for properties with enhanced wind-resistance features like hurricane straps. It’s worth checking with your provider to see if you qualify for any savings.
Assessing Your Existing Roof for Hurricane Straps
Before you start installing hurricane straps, it’s essential to evaluate your current roof structure. This assessment will help determine the best approach and identify any potential issues that need addressing.
1. Inspect Your Roof’s Structure
- Roof Type: Identify the type of roof you have, such as gabled, hip, or flat. Different roof types may require specific hurricane strap installations.
- Roof Condition: Check for any existing damage or wear that may need repair before installing hurricane straps. Ensure that the roof deck and trusses are in good condition.
2. Consult Local Building Codes
- Building Codes and Regulations: Different regions have varying building codes and regulations for hurricane strap installation. Familiarize yourself with local codes to ensure compliance and to determine the required materials and installation methods.
3. Determine Strap Placement
- Strap Locations: Identify where hurricane straps will be most effective. Typically, straps are placed at critical points where the roof meets the walls, including at the corners and along the eaves.
How to Install Hurricane Straps on an Existing Roof
Installing hurricane straps on an existing roof requires careful planning and execution. Here’s a step-by-step guide to help you through the process:
1. Gather Necessary Materials and Tools
- Materials: Hurricane straps (also known as hurricane ties or wind straps), nails or screws, and any additional reinforcement materials.
- Tools: Hammer or nail gun, screwdrivers, tape measure, and a ladder or scaffolding.
2. Prepare the Roof
- Safety First: Ensure that you have the proper safety equipment, including harnesses and safety lines if working at height. Use scaffolding or ladders safely.
- Clear Debris: Remove any debris from the roof to create a clean working area. This helps prevent accidents and ensures that the straps will adhere correctly.
3. Install the Hurricane Straps
- Locate and Mark Points: Based on your assessment, mark the points on the roof and walls where the hurricane straps will be installed.
- Attach Straps to Roof: Position the hurricane straps over the roof trusses or rafters. Use nails or screws to secure the straps to the trusses, ensuring that they are tightly fastened.
- Secure Straps to Walls: Attach the other end of the straps to the top plates of the walls. Ensure that the straps are properly aligned and secured to provide maximum strength.
4. Inspect and Test
- Check Installation: Verify that all straps are securely attached and properly aligned. Ensure there are no loose connections or gaps.
- Perform a Test: If possible, perform a test to ensure that the straps provide the desired level of support. This can involve applying pressure to simulate wind forces.
Professional Installation vs. DIY
While installing hurricane straps can be a DIY project for experienced homeowners, professional installation is often recommended, especially for those unfamiliar with roofing or structural work.
Advantages of Professional Installation
- Expertise: Professionals have the experience and knowledge to ensure proper installation according to building codes and best practices.
- Efficiency: A professional team can complete the installation more quickly and efficiently, minimizing disruption to your home.
- Warranty: Many professional installers offer warranties on their work, providing additional peace of mind.
Common Challenges and Solutions
1. Access Issues
- Challenge: Accessing certain areas of the roof or walls may be difficult, particularly in high or steep sections.
- Solution: Use scaffolding or extendable ladders to reach difficult areas safely. If necessary, hire a professional with the equipment and expertise to handle challenging access situations.
2. Structural Damage
- Challenge: Existing damage to the roof or walls may complicate the installation process.
- Solution: Address any repairs needed before installing hurricane straps. Ensure that the roof and wall structures are sound to provide a stable base for the straps.
3. Compliance with Building Codes
- Challenge: Navigating local building codes and regulations can be complex.
- Solution: Consult with local building authorities or a professional contractor to ensure that your installation meets all code requirements.
Maintaining Your Hurricane Straps
Once installed, hurricane straps require minimal maintenance, but it’s important to perform regular inspections to ensure their continued effectiveness:
- Periodic Checks: Inspect the straps periodically for any signs of wear, rust, or damage. Address any issues promptly to maintain their strength.
- Post-Storm Inspections: After severe weather events, check the straps for any signs of displacement or damage. Make repairs as needed to ensure ongoing protection.
Conclusion
Installing hurricane straps on an existing roof is a crucial step in fortifying your home against severe weather. By enhancing the connection between your roof and walls, hurricane straps provide added strength and resilience during storms. Whether you choose to undertake the installation yourself or hire a professional, following the proper procedures and ensuring compliance with local codes will help protect your home and provide peace of mind during hurricane season.


Leave a Reply