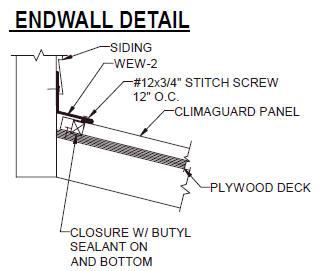
A standing seam metal roof to wall detail is a critical element in the design and construction of a durable and watertight roofing system. This detail ensures that the transition between this roof and the wall is properly sealed, preventing water infiltration and potential damage. In this article, we will explore the importance of this roof to wall detail, its key components, and best practices for creating a secure and waterproof connection.

The Significance of a Secure Transition:
A standing seam metal roof to wall detail is essential for maintaining the integrity of the roofing system and the overall building envelope. Without proper sealing and detailing, water can penetrate the joint between the roof and the wall, leading to leaks, moisture-related issues, and even structural damage over time. Ensuring a secure transition is crucial for protecting the building and its occupants from the elements.
Key Components:
- Flashing: Flashing is a key component that bridges the gap between the standing seam metal roof panels and the vertical wall surface. Usually composed of metal, it acts as a barrier to prevent water infiltration.
- Counterflashing: Counterflashing is installed over the top of the flashing, creating an additional layer of protection. It helps direct water away from the joint and prevents water from seeping underneath the flashing.
- Attachment: Proper attachment methods are crucial for securing the flashing and counterflashing to both the roof and the wall. Depending on the design and materials, you can use mechanical fasteners or adhesive bonding.
- Sealing: Apply sealants (caulking or tapes) at flashing, counterflashing, roof panel, and wall junctions for a watertight seal. These sealants prevent water from infiltrating the joint.
Creating a Secure:
- Design Considerations: Design the detail to accommodate movement, expansion, and temperature-related changes in standing seam metal roof-to-wall connections.
- Material Compatibility: Check compatibility of flashing, counterflashing, and sealants with roofing material and wall substrate to prevent corrosion or degradation.
- Installation Expertise: Proper installation requires skilled professionals who are familiar with metal roofing systems and flashing techniques. Improper installation can compromise the integrity of the detail.
Benefits of a Well-Executed Detail:
- Waterproofing: Properly executed, this roof detail prevents water infiltration, safeguarding the building from leaks and water damage.
- Longevity: A secure transition enhances roofing system durability by reducing deterioration and corrosion risks.
- Aesthetics: A well-executed detail enhances building appearance with clean lines and seamless roof-to-wall transitions.
Conclusion:
A standing seam metal roof to wall detail is a crucial component of a watertight and durable roofing system. Prioritize design, materials, expertise, and attention to detail for a secure transition against water infiltration and damage. Prioritize a well-executed detail for lasting standing seam metal roof function, aesthetics, and investment protection while upholding building envelope integrity.


Leave a Reply