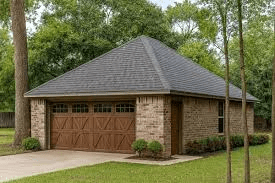
Designing roof framing where the garage sits forward of the house framing components can be tricky, even for experienced builders. Misalignment between rooflines can lead to leaks, structural stress, or poor curb appeal.
If you’re planning a home addition or garage extension, understanding how to connect two different roof planes safely and attractively is essential. This guide explains the right techniques, framing components, materials, and structural principles behind aligning a garage roof that projects ahead of the main house.
Understanding the Design Challenge
When a garage projects forward from the main house, its roof planes often don’t align perfectly. The challenge lies in connecting:
- The garage roof ridge (typically lower or at a different pitch)
- The main house roof
- Shared wall and truss systems
Read too: Hail Damage Roof Repair: Essential Guide to Restoring Your Home’s Protection
Without careful planning, this setup can cause water drainage issues, load distribution problems, and visual imbalance in your home’s façade.
How Roof Framing Works When Garage Sits Forward
1. Basic Framing Concept
In most residential designs, garage extensions are built several feet forward of the main house to provide driveway space or aesthetic variation. The key goal is to ensure structural continuity between the two roof systems.
The roof framing components typically include:
- Rafters or Trusses – Main structural members that define roof shape
- Ridge Board – The top horizontal beam connecting rafters
- Ceiling Joists – Support for ceiling drywall and rafter stability
- Gable End Framing – Provides vertical support at roof ends
- Sheathing – Plywood or OSB panels that create the roof deck
When the garage roof sits forward, builders must tie the roof planes together so they share load-bearing walls or engineered truss connections.
2. Aligning Roof Pitches and Planes
The most common mistake homeowners make is mismatched roof pitches between the garage and the house.
To prevent that:
- Measure both roof pitches (e.g., 6/12 for the house and 8/12 for the garage).
- Decide whether to match the pitch (for uniform look) or vary it (for visual interest).
- Ensure roof valleys align correctly to drain water away from the intersection.
Pro Tip: A minimum slope difference of 2 units can help differentiate rooflines while maintaining proper water flow.
3. Structural Connection: Where Roofs Meet
When the garage roof ties into the main house roof, there are two main connection types:
| Connection Type | Description | Best Used When |
|---|---|---|
| Valley Connection | The garage roof intersects the main roof, forming an inside valley | Garage sits slightly forward or attached at an angle |
| Step Roof or Separate Plane | The garage roof remains distinct, with its own ridge and fascia | Garage is significantly forward or lower than the main roof |
In both cases, the valley flashing and underlayment must be installed carefully to prevent leaks. A single misaligned joint can channel rainwater into the wall cavity — a common cause of rot and mold.
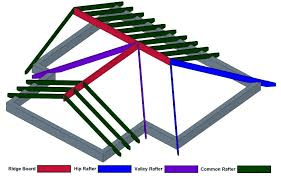
4. Key Roof Framing Components Involved
To understand this design better, here are the main framing elements you’ll deal with:
| Component | Function |
|---|---|
| Rafters | Support roofing materials and transfer load to walls |
| Ridge Board | Central beam connecting rafter tops |
| Valley Rafters | Diagonal rafters forming intersection valleys |
| Hip Rafters | Outward corners where roof planes meet |
| Jack Rafters | Short rafters connecting valleys or hips |
| Lookouts | Support eaves overhang |
| Trusses | Pre-engineered units simplifying roof assembly |
Each piece must be properly measured, cut, and fastened for a strong, leak-free roof.
For more on traditional roof framing techniques, you can refer to Wikipedia’s Roof Construction page.
Step-by-Step Guide: Framing Roof Where Garage Projects Forward
If you’re a builder or DIY enthusiast, here’s a simplified step-by-step approach to get clean alignment and support:
Step 1: Measure Setback and Pitch
- Determine how far the garage projects forward (e.g., 3 to 6 feet).
- Match or adjust the roof pitch so valleys and ridges align visually.
Step 2: Establish Bearing Points
- Identify the load-bearing wall shared between garage and house.
- Install double top plates where the garage wall meets the main structure.
Step 3: Set Ridge Boards
- If the garage has a lower ridge, install separate ridge boards but align horizontally using string lines.
- Maintain a consistent overhang depth (usually 12–18 inches) for visual symmetry.
Step 4: Frame Rafters or Trusses
- Use common rafters for the main roof plane.
- Install jack rafters to fill valley areas.
- Use metal hurricane ties or simpson connectors to strengthen joints.
Step 5: Apply Sheathing and Weatherproofing
- Lay 5/8-inch OSB or plywood across rafters.
- Install ice and water shield in valleys and around intersections.
- Apply roof underlayment before adding shingles.
Step 6: Integrate Drainage and Flashing
Proper flashing is vital when roof planes meet. Use:
- Step flashing under shingles
- Valley flashing for joint seams
- Kick-out flashing at wall-roof intersections
This step ensures that runoff from the higher house roof doesn’t flood the lower garage section.
Pros and Cons of Forward Garage Roof Designs
| Advantages | Disadvantages |
|---|---|
| Adds architectural depth and curb appeal | More complex roof framing and flashing |
| Creates larger driveway or entryway | Increased cost due to extra framing |
| Can provide shade to front façade | Potential drainage and water flow issues |
| Flexible for various home styles | May require structural engineering approval |
While this design offers great visual interest, success depends on precise planning and framing alignment.
Design Tips for Seamless Integration
- Keep ridge heights consistent for a unified look.
- Use gable or hip roof transitions for smoother joining angles.
- Add false dormers or roof returns to visually balance height differences.
- Choose matching fascia and soffit materials to create harmony.
- Consider 3D modeling software (like SketchUp or Chief Architect) to preview alignment before framing.
Expert Insight
According to Mark Latham, a senior framing engineer at NY Structural Design Group:
“When your garage projects forward, always treat the roof as two independent systems connected by engineered valley rafters. This maintains load integrity and reduces stress points between structures.”
This principle aligns with International Residential Code (IRC) Section R802, which governs roof framing and load connections.
Common Mistakes to Avoid
- Skipping structural inspection before connecting roofs.
- Mismatched rafter spacing — always keep 16 inches on center (O.C.).
- Poor valley flashing installation, causing chronic leaks.
- Insufficient overhang alignment, creating awkward façade lines.
- Neglecting ventilation in newly connected attic spaces.
Roof Framing Material Recommendations
| Material Type | Best Use | Lifespan (Years) |
|---|---|---|
| SPF Lumber (Spruce-Pine-Fir) | Standard rafter and truss framing | 50+ |
| LVL Beams (Laminated Veneer Lumber) | Long spans or ridge support | 60+ |
| OSB or Plywood Sheathing | Roof deck surface | 30–40 |
| Galvanized Connectors | Metal fasteners for durability | 50+ |
Using engineered wood for ridge boards and metal connectors ensures your roof withstands heavy snow and wind loads common in northeastern climates.
Integrating Energy Efficiency
If you’re reframing or adding a new roof section:
- Add R-38 to R-49 insulation between rafters.
- Include ridge and soffit vents for airflow.
- Use radiant barriers under the roof deck to reduce heat gain.
These features not only lower utility bills but also extend roof lifespan by reducing moisture buildup.
FAQ Section
1. How do I connect roof framing when my garage sits forward?
Use valley rafters or step roof connections to merge both roofs. Ensure you install flashing and underlayment properly to prevent leaks.
2. Should the garage roof have the same pitch as the house roof?
Not necessarily. Many designs use a slightly lower or steeper pitch for the garage to add dimension and help with water flow.
3. Can trusses be custom-built for offset garage designs?
Yes. Pre-engineered trusses can be ordered with custom angles to fit offset garages perfectly, ensuring precise load transfer.
4. Do I need a permit to modify roof framing?
Absolutely. Any structural change, including framing or roofline alterations, requires a building permit and sometimes engineering approval.
5. What’s the best flashing for where two roofs meet?
Use pre-bent galvanized steel or aluminum valley flashing with ice and water shield membranes underneath for maximum leak prevention.
6. How can I make the roof transition look seamless?
Add decorative fascia trim, maintain equal overhang depths, and use consistent roofing material across both roof sections.
Conclusion
Designing roof framing where the garage sits forward of the house framing components requires careful attention to structural detail, water management, and aesthetic balance.
By understanding roof geometry, framing elements, and connection techniques, homeowners and builders can create a durable, visually cohesive structure that enhances curb appeal and functionality.
If you’re planning a home addition or roof renovation, always consult a licensed contractor or structural engineer before framing begins — and share this article to help others master this essential construction concept!

Leave a Reply