Joining two gable end roofs against an existing house can be a challenging task, especially when ensuring structural integrity and weatherproofing. For homeowners and DIYers tackling Tie Two Gable End Roofs Together Against An Existing House, understanding the proper techniques is essential. This guide provides clear instructions, expert insights, and practical tips to ensure a safe and durable roof connection.
Why Properly Connecting Gable Roofs Matters
Connecting multiple roofs is not just about aesthetics—it directly impacts the structural integrity, drainage, and longevity of your home:
- Structural Stability: Improper connections can lead to sagging or leaks.
- Weatherproofing: Seamless integration prevents water infiltration.
- Energy Efficiency: Proper alignment reduces heat loss through gaps.
Read too: How Long Do Standing Seam Metal Roofs Last? A Comprehensive Guide to Durability and Longevity
Expert Insight: Structural engineer Mike Holmes states, “When joining two roofs, the key is a solid ledger connection and proper flashing. This prevents long-term damage and protects the home.”
Step-by-Step Guide: Tie Two Gable End Roofs Together
1. Plan the Roof Connection
- Measure the existing house wall and the gable ends accurately.
- Determine roof pitch, overhangs, and alignment.
- Draw a scaled diagram to visualize the connection.
Tip: Use a level and chalk line to ensure straight placement.
2. Install a Ledger Board
- Secure a ledger board along the existing wall to support the new gable roof.
- Use lag bolts spaced every 16–24 inches to anchor it firmly.
- Ensure the ledger is level and flush with the top of the existing wall.
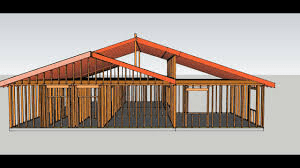
3. Frame the New Gable Roof
- Construct the rafter system with matching pitch to the existing roof.
- Use collar ties or ridge beams for extra support.
- Check alignment before permanently fastening rafters.
4. Connect Roofs and Install Flashing
- Use flashing at the junction to prevent water intrusion.
- Ensure shingles or panels overlap correctly at the connection point.
- Seal gaps with high-quality roofing sealant.
Pro Tip: For larger spans, consider metal brackets or hurricane ties for additional strength.
5. Finish Roofing and Inspect
- Lay shingles or panels along the new roof, blending seamlessly with the existing roof.
- Inspect all fasteners, flashing, and overlaps for tightness and proper sealing.
- Ensure gutters and downspouts are adjusted for proper drainage.
Advantages vs Disadvantages of Tying Gable Roofs
| Advantage | Disadvantage |
|---|---|
| Provides expanded living or storage space | Requires precise measurement and skill |
| Seamless roofline if done correctly | Poor installation can cause leaks |
| Enhances home value | May increase project cost |
| Improves structural stability when reinforced | Can be complex for DIYers |
Materials and Tools Needed
- Ledger board, lag bolts, metal brackets
- Roofing nails or screws
- Shingles or roof panels
- Flashing and sealant
- Hammer, drill, measuring tape, chalk line, safety harness
FAQ Section
Q1: Can I connect two gable roofs myself?
Yes, for small projects with proper safety precautions. For large spans or complex angles, hiring a professional is recommended.
Q2: How do I prevent leaks where the roofs meet?
Install flashing and use high-quality sealant. Ensure shingles or panels overlap properly.
Q3: What roof pitch works best for connections?
Ideally, the new gable should match the existing roof pitch to allow seamless water runoff.
Q4: Are special fasteners required for this connection?
Lag bolts for the ledger, hurricane ties for rafters, and standard roofing nails for shingles are commonly used.
Q5: How long does this project typically take?
Depending on roof size and complexity, expect 1–3 weeks including framing, installation, and finishing.
Conclusion
Tying two gable end roofs together against an existing house requires planning, precision, and quality materials. Following these step-by-step instructions ensures a strong, leak-free connection that enhances both structural integrity and home value.
Share this guide with friends or family planning roof expansions to help them execute a safe and professional project!


Leave a Reply